

Chords
Buzzing and muted strings in your chords come from just one thing: a note that isn’t making good contact with the fret. Here’s why it happens, where to put your fingers, two exercises that fix it, and when it might be your guitar.
Buzzing strings can come from a lot of things, but when your chords buzz, it’s almost always because one or more notes isn’t pressed cleanly against the fret. The good news is that it’s not as complicated as it seems. With a little practice, the right habits take over, and you have a built-in meter to check them: your ears.

Why Notes Buzz
When you press a string, it presses against the fret, the metal bar across the neck. Press just a little and the note thuds. Press enough to touch the fret but not firmly, and it buzzes. A little more pressure and you get a clear note. Pressing much too hard can pull the note out of tune.
How hard you strike the strings matters too: strumming harder makes buzzing more likely.
Where to Put Your Fingers
Get your finger as close to the fret as you can without being on top of it. On top of the fret, the fleshy part of your finger deadens the string. Too far back, and it’s hard to get a note that doesn’t buzz. Right next to the fret, you don’t have to press as hard.
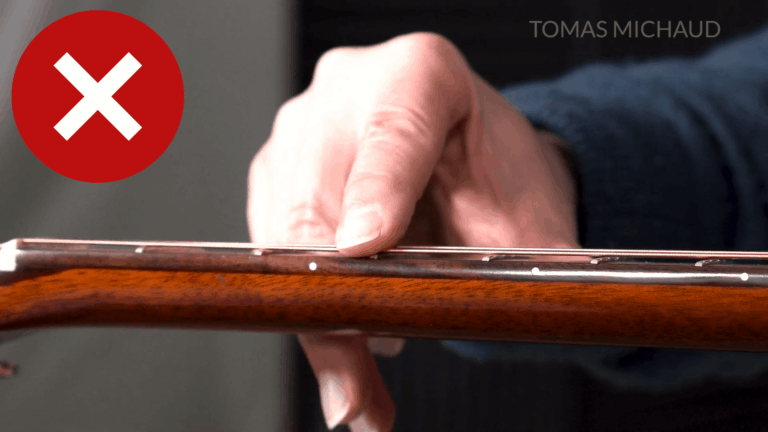

In chords you can’t always get every finger right up to the fret, so get each one as close as you can. Try this: fret a note right behind the fret, then slide your finger back a little at a time until it starts to buzz. You’ll find there’s a range that works.
Fingers That Mute Other Strings
The other common problem is a finger leaning on the next string and muting it. A few things help:
- Arch your fingers so they come up and then down onto the string, pressing as straight down into the fretboard as possible, with the part just behind the very tip.
- Keep the pad of your thumb behind the neck, roughly opposite your fingertips, as if they were pinching together with the neck in between. That gives you the most leverage with the least strain.
- Let your elbow hang straight down and keep your shoulder and arm relaxed.
There’s no magic fix. Go slowly when you put your fingers on the strings, make small adjustments, and give it time. Everyone starts out muting strings, and wherever you are right now is fine. Many adults try to go faster than they’re ready to. Your mind and body are recording your movements, so it pays to be patient and get it right.
Two Exercises That Fix It
It might seem that the fastest way to clean chords is to finger the chords and muscle through them. It isn’t. A few simple exercises that let you focus on finger placement speed up the whole process and save you from habits you’d have to undo later.
1. The Finger Developer
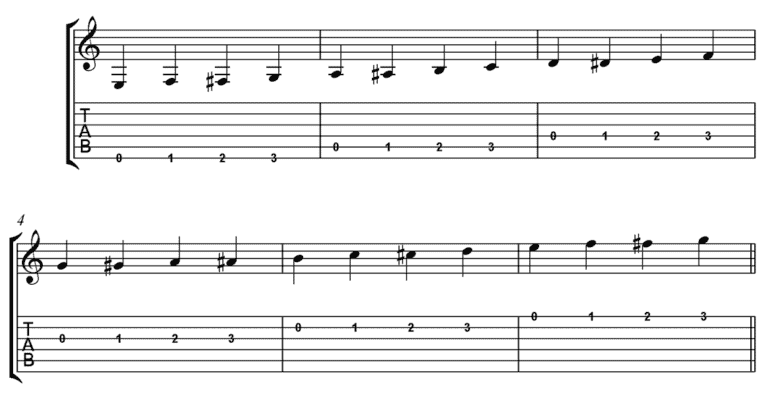
Play one note at a time: the open string, then the 1st, 2nd and 3rd frets, with your first, second and third fingers. Start on the 6th string, and add the other strings when that feels good. Go slowly and pay attention to where your finger lands, how hard you press and how hard you pick. The goal isn’t speed. It’s clear notes with the least tension in your hand. It makes a good warm-up, too.
2. A Chord Exercise
Then bring the same attention to chords: place each finger close to the fret, check your hand position, and stay relaxed. I walk through it step by step in Secret to Learning Guitar Chords Fast.
Is It Me or My Guitar?
Students often assume the guitar is the problem, but 9 times out of 10 it’s technique. That said, it never hurts to have your guitar set up by a professional. They’ll adjust the neck, check the frets, and set the string height at the nut and bridge. Depending on the guitar, they may be able to make a big difference.
If you’re just starting with chords, see your first guitar chords.
Want more lessons like this one? Try Real Guitar Success free for 14 days.