Ready to learn three basic guitar chords that will enable you to play hundreds of songs right away? You may not believe it's possible, but it's true!
These three basic chords I am going to show you, will give you the key to unlocking countless songs. And once you learn these chords you’ll be able to use them immediately to play those songs.
In this lesson, we’re going to learn the G Major, C Major, and D Major guitar chords. By the end of this lesson you’ll be playing a real song using these 3 chords!
(The term “G Major” and “G” are two names for the same chord. The same applies to the C Major chord (aka “C”) and the D Major chord (aka “D”))
Start Learning The G Chord
The G Major chord is the first of the fundamental guitar chords. It’s called an open chord, which just means it uses open strings. These open chords sound great and are the most common guitar chords you’ll play.
We’re starting with G Major because the key of G is a guitar friendly key. You can play the G chord several ways, but this is my favorite.
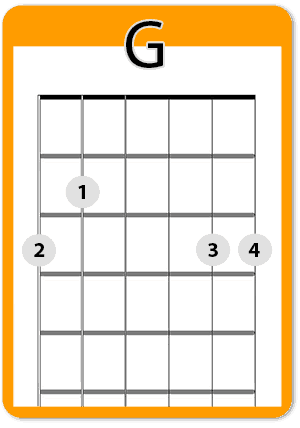
If you’d like a review of how to read a chord diagram check out this short lesson.
Let’s Take the G Chord Step-By-Step
Step 1
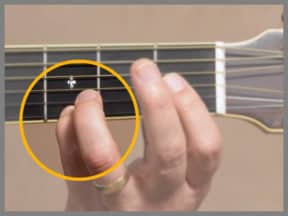
Place your pinky on the 3rd fret of the 1st string (the thinnest string). Your ring finger will go right above it on the 3rd fret of the 2nd string.
Step 2
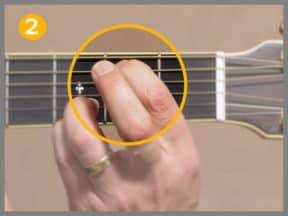
Jump up a couple strings and place your index finger on the 2nd fret of the 5th string.
Step 3
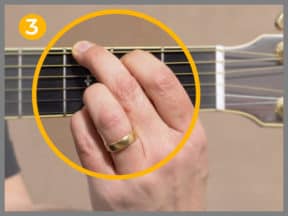
Lastly, place your middle finger on the 3rd fret of the 6th string. The 3rd and 4th strings will be open strings.
Make sure you’re using your fingertips to fret each note. Get as close to the fret as you can without being on top of it. Lastly, make sure your fingers aren’t resting on any strings causing them to be muted.
Now strum. How does it sound? If it doesn’t sound perfect, don’t worry. That’s common. Let’s do an exercise to help you memorize and play the G chord.
G Guitar Chord Exercise
The Press And Release Exercise
This is an exercise I use on any new chord. I call it the “Press and Release” exercise. Here’s how you do it.
- Form the G chord and release without strumming. Form the chord G again and release. Repeat this a few times.
- Now form the chord and give it a strum. If it sounds clean, release, form the chord again and strum.
- If you have any buzzing or muted notes make minor adjustments until it sounds good. Strum and release.
Do this for a few minutes at a time every time you practice guitar. If your hand is getting sore then take a break and come back to it. With this intentional exercise you’ll strengthen your hand and fingers much quicker.
Once you can cleanly strum the G chord you’re ready to move onto the next chord.
Learn the C Chord On Guitar
I like to call this the Funny C Chord. It’s a variation of the traditional Folk style C chord. The technical name is Cadd9, but for now we’ll just call it C. If you know the G chord it’s actually a bit easier to play.
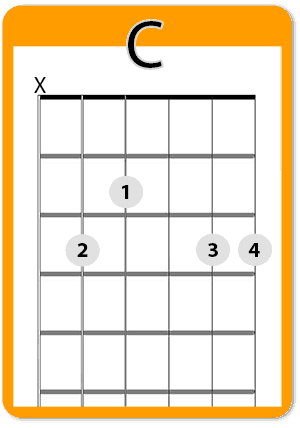
Start by forming the G Major chord. From there, you’ll simply move your index and middle fingers up one string.
- Move your index finger to the 2nd fret of the 4th string.
- Move your middle finger to the 3rd fret of the 5th string.
- Keep the 3rd string as an open string.
Keep your pinky on the 3rd fret of the 1st string, and your ring finger on the 3rd fret of the 2nd string. Strum just the first 5 strings. You can use your middle finger to help mute the 6th string. Position it so you’re just barely touching the 6th string while still fretting the 5th string.
The Funny C Chord Exercise
Just like the G chord, we’re going to do the Press and Release exercise.
- Form the C chord and press down the strings. Release without strumming and shake your hand out.
- Count to 5 and form the C chord again. This time strum the C chord once or twice. Make any adjustments you need to.
- While the chord is still formed press your fingers down just a little more. Release and shake it out.
Do this a few times and then count to 3 in between strumming the chord and forming it again.
Make this a part of your practice sessions and you’ll have it down in no time!
Switching Between G and C
Changing between G and our C chord is one of my favorite movements. Start by forming a G chord. Give it a strum to make sure it sounds good. Then we’ll switch to the C chord. Here’s the trick.
Keep your pinky on the 3rd fret of the 1st string, and your ring finger on the 3rd fret of the 2nd string. Use these as anchors to change chords.
From there move your index finger up one string to the 4th string 2nd fret. Your middle finger will move to the 5th string 3rd fret.
By keeping your pinky and ring fingers as anchors it gives you more leverage to form the C chord. It also means more strings will ring out in between chords.
How to Play the D Chord
The last chord we’re going to learn is the D Major chord. Also called the D chord.
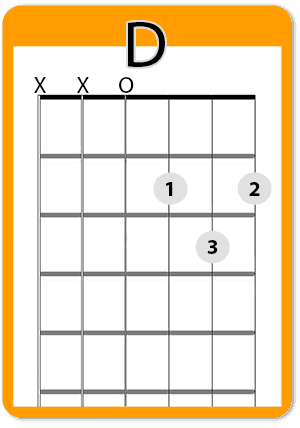
The D chord is the smallest of the Major chords. It uses just 4 notes.
- Place your index finger on the 3rd string 2nd fret.
- Place your ring finger on the 2nd string 3rd fret.
- Place your middle finger on the 1st string 2nd fret.
- The 4th string will be open.
It’s going to feel a little cramped at first but that’s ok. Do the same Press and Release exercise to get used to the chord. Remember to only strum the first four strings.
Beautiful D Chord Exercise
Here is a fantastic way to practice the D chord. You’ll actually learn two great sounding variations of the D chord at the same time. The Dsus2 and Dsus4.

Dsus4
- Form a D Major chord. Place your pinky on the 3rd fret of the 1st string.
- Keep your middle finger on the 1st string 2nd fret.
- To go back to D just lift your pinky.
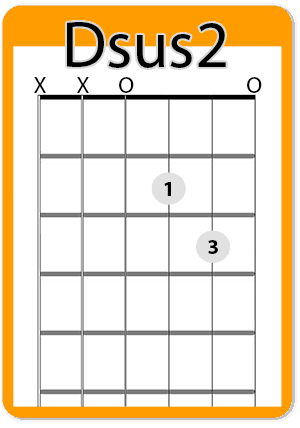
Dsus2
- Form a D Major chord.
- Lift your ring finger so the 1st string is open.
- That’s it!
With these to D variations you’ll only strum the first four strings. Here’s an exercise to practice them all together.
- First, form a D Major chord and strum
- Then play a Dsus4 by placing your pinky down on the 3rd fret of the 1st string.
- Lift your pinky and strum the D chord again
- Lastly, lift your middle finger and strum the Dsus2
The chord progression is D-Dsus4-D-Dsus2.
Switching Chords: G - C - D
Now that you know all three chords, let’s put them together in a single exercise. Remember in the G to C exercise how we used fingers as anchors? We’re going to do the same thing here. The beautiful thing about these 3 chords is how easily they flow to each other.
Start by forming a G chord. Use your pinky and ring fingers as anchors and form the C chord. Next you’ll switch to a D chord.
- To switch to a D chord, keep your ring finger and pinky as an anchor.
- Form the rest of the D chord without lifting your pinky.
- Just before you strum the D chord, lift your pinky.
You may have noticed that you form a Dsus4 at first. These steps all happen pretty much at the same time. It takes practice to get it down into one fluid motion.
Let’s reverse and go to the C chord.
- Keep your ring finger as an anchor and place your pinky on the 3rd fret of the 1st string.
- Move your index finger and middle fingers to form the C chord and strum.
- Move your index and middle fingers to play the G chord, while keeping your ring and pinky fingers as anchors.
Watch the video closely to see that I’m changing chords just before I strum. By utilizing anchor fingers and open strings you won’t notice any gaps between chords!
Your First Song With G - C - D Chords
Now it’s time to learn a song with all three chords. This song is played in 3/4 (three-four) time. That means there are 3 beats per measure instead of four. Here is the chord pattern, with each chord being a full measure (3 beats):
G-D-D-G
G-C-D-G
(Jump to 5:05 in the video to hear the basic version)
We’ll start by strumming once per beat. This is the best way to start out. Start slow and make sure your strums are on time and chord changes are clean. Once you have this down pretty well you can add a different strum pattern.
When you’re ready to learn this new strum pattern, skip to 6:04 in the video.
Finally, when you’re ready to play along with the whole song go to 8:06 in the video!
How do you like these three chords together? If you know the Folk style C chord, which do you like that version or the Cadd9 version more? Let me know in the comments!

Many thanks really enjoyed these chord changes and will practice more in the morning
You’re very welcome Fortune. – Tomas
muy bueno. Desde Argentina, en cuarentena un muchacho de 77años, “beguiner”
I just started this week and was amazed by your way to explain. I want to learn the Happy birthday! song so I'll play to myself, as my birthday is coming… I hope I can learn it, because it's almost there. Haha.
Picked up my first guitar last year at 73 years of age – just before lockdown in England – a classical nylon strings – never done chords – never done strumming – going to give it a go – just want to say to you Tomas – thank you for the very clear lessons on chords and strumming – every day is school day and I am having fun – isn't that the whole point – Marie
We have been in lockdown and restrictions made it impossible to see friends – but a second hand guitar bought in a charity shop just before lockdown – was retrung and has been a daily companion for this 74 year old – who has been finger picking on this guitar – which I now know is a classical – over Christmas I found your chords lessons Tomas and I am enjoying learning chords your way – which before has always seemed a bit daunting – so just want to say thank you