

Guitar skills
Four arpeggios, E minor, A minor, C major 7 and B7, played on the top four strings, are all you need to start improvising over a chord progression.
Arpeggios sound beautiful, and they give you a fresh view of the fretboard. These four shapes also give you a starting point for improvising: you play through the chord changes one note at a time, then start adding notes of your own.

The Four Chord Shapes
The progression is E minor, A minor, C major 7 and B7. All four shapes sit higher on the neck than you may be used to, and they use only the top four strings, so leave the fifth and sixth strings alone.
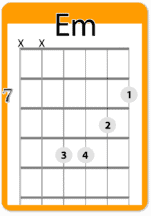
- E minor: first finger on the first string at the seventh fret, second finger on the second string at the eighth, and your third finger and pinky side by side on the fourth and third strings at the ninth. Technically it’s an inversion, because the root isn’t the lowest note. It’s a version I use all the time.
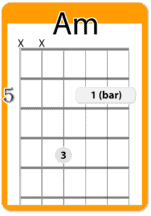
- A minor: a partial barre with your first finger across the first three strings at the fifth fret, and your third finger on the fourth string at the seventh. If you’re working up to barre chords, this is a great step on the way, and it’s a useful chord in its own right. If it’s good enough for Jimmy Page in Stairway to Heaven, it’s good enough for me.
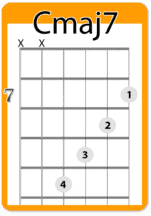
- C major 7: one of my favorite voicings. Start with your first finger on the first string at the seventh fret, then go down one string and up one fret with each finger, until your pinky is on the fourth string at the tenth.
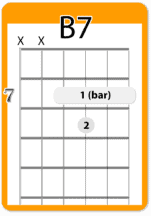
- B7: a partial barre across the first four strings at the seventh fret, with your second finger on the third string at the eighth. Like the E minor, it’s an inversion, which gives it a different flavor.
Strum these shapes together and you get what I call baby chords: higher-pitched chords that sound great on their own.
Practice the Shapes First
The hardest part of playing arpeggios is changing chords quickly, so spend some time on the shapes before you play a single note.
- Finger each shape without playing it. Put your fingers down, take them off, and repeat. This builds the muscle memory.
- Now strike the chord each time you finger it, and see how quickly your fingers can land.
- Change between two chords, then add the third and the fourth.
- When you can get your hand to each chord about 80 percent of the way to where you’d like, move on. Don’t wait for perfect.
Play the Arpeggios in Time
An arpeggio is a chord played one note at a time. Each of these shapes has four notes, so play one note per beat, from the lowest string to the highest, and let every note ring.
Next, play them in time with a metronome, or just tap your foot. Start slower than you think you need to. I start around 65 beats per minute, which leaves plenty of time to change chords, then work up little by little. The backing track I use in the video is around 120.
When going up feels good, play each arpeggio up and back down: four notes from low to high, then back down. It’s a new challenge, so slow down again and work back up.
Turn It Into an Improvisation
Once you can play the arpeggios along with the backing track, try adding a few notes from the scale between the chord notes. That’s where it starts to sound like an improvisation, and it’s a lot of fun. I put a link to the backing track at the end of the video.
You may recognize the approach from my other lessons: learn the pieces one at a time, build on them slowly, then put it all together in time. That recipe works for almost anything you learn on guitar.
Want more lessons like this one? Try Real Guitar Success free for 14 days.
I enjoyed your E Spanish gypsy. I knew it was also Phrygian dominant. BUT…That meant nothing to me !!! You also had a B Harmonic Minor (on the web site. Also kind of a HUH !!! So… you made me do research, and now I got it…mostly ??? Spanish gypsy comes from 5th of Harmonic Minor, with a note sharped (I think)…In the case of E gypsy it’s G to G#
Thanks