


Chords and strumming
Barre chords are the first big hurdle for most players. Instead of forcing a full barre right away, build one in steps, from a power chord to a full G barre chord, then learn the four shapes that cover every major and minor chord.
Let’s be honest: barre chords are tough, and I’ve known people who avoided them for years. With the right approach, though, they’re much more manageable. The steps below strengthen your fretting hand, get your notes ringing without buzzing, and give you chord options you can use right away.

How to Play a Barre Chord, Step by Step
1. Start With a Power Chord
Power chords are the foundation of most barre chord shapes, and they’re useful on their own.
- Index finger on the 6th string, 3rd fret.
- Ring finger on the 5th string, 5th fret.
- Pinky on the 4th string, 5th fret.
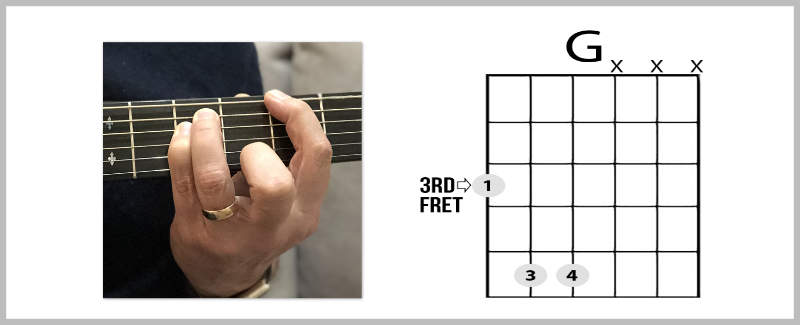
Strum those three strings. This is a G power chord. Keep your fingers close to the frets but not on top of them. Too close or too far, and you’ll get buzzing.
2. Add a Finger
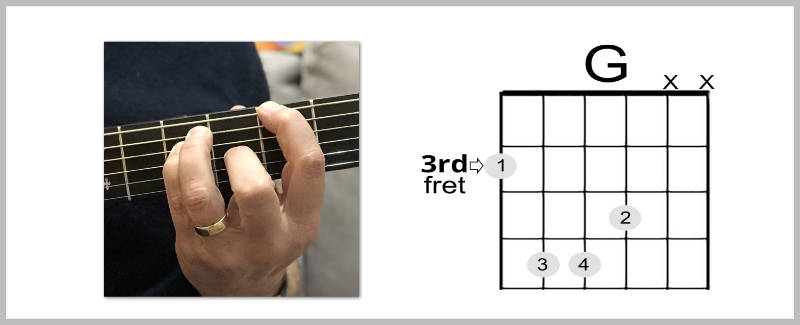
Keep the power chord and add your middle finger on the 3rd string, 4th fret. I call this a faux barre chord. It may be a stretch, so make the shape a few times before you strum the four strings, then adjust and strum again.
3. Strengthen the Barre
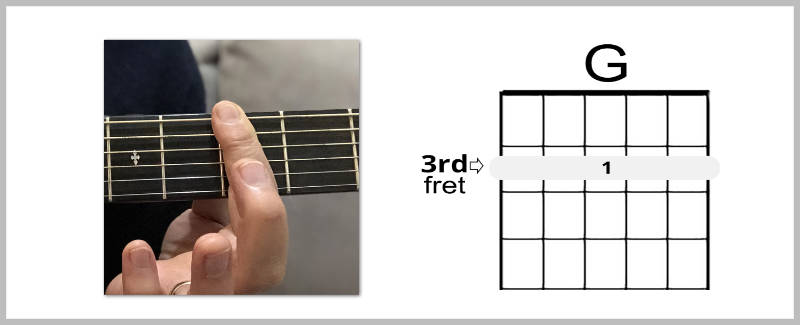
This one has helped many of my students. Lay your index finger across all six strings at the 3rd fret, rolled slightly onto its side. Press down and release without strumming, several times. When that feels OK, press and strum all six strings, and adjust if anything buzzes. A few minutes a day and your finger gets noticeably stronger.
4. Put It Together
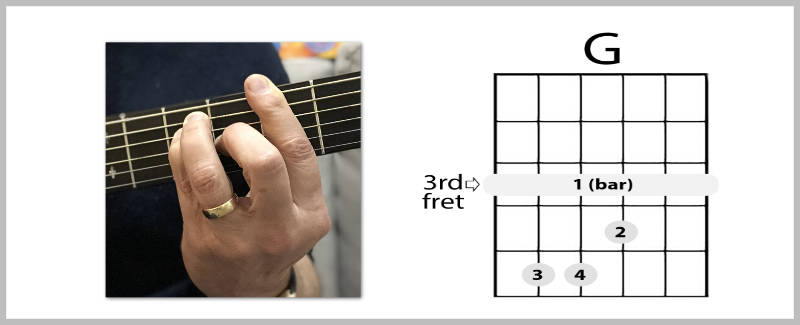
A full barre chord is the faux barre chord plus the index finger barre, so you’re already most of the way there. Make the faux barre chord, bring your index finger down across the 3rd fret, adjust your hand and wrist, and strum all six strings. Some players find it easier to place the barre first and then the other fingers. Try both.
5. Learn the Notes on the 6th String
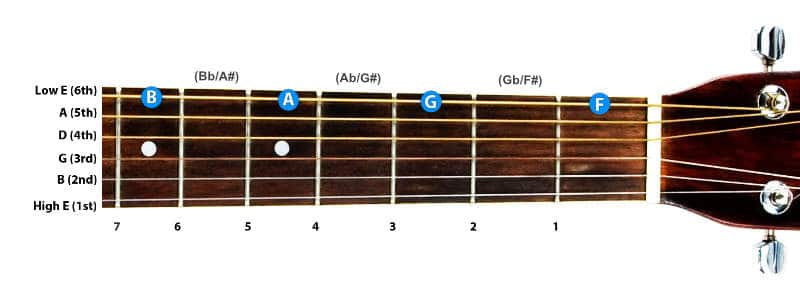
This shape is movable. The note on the 6th string, the root, names the chord. Learn the natural notes first: the sharps are one fret above and the flats one fret below. There’s no sharp or flat between E and F, or between B and C. Play each natural note up to the 7th fret, saying its name out loud, then come back down.
6. Use It in a Chord Progression
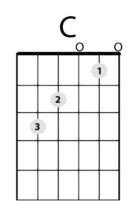
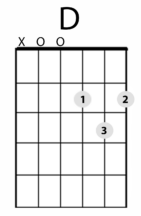
Play G, C, D, C, four strums each, with the G as your barre chord. That’s a I-IV-V-IV progression, used in many styles. Use a metronome at a slow tempo, speed up gradually, then add your favorite strum.
The Four Barre Chord Shapes
Barre chords are open chord shapes moved up the neck, with your index finger acting as a capo. These four movable shapes give you every major and minor chord.
E Major Shape (6th-String Root)
Play an open E chord with your middle, ring and pinky fingers instead of the usual fingers, leaving your index finger free. Slide it up three frets and barre the 3rd fret with your index finger: that’s the G barre chord you just learned. Move it to the 5th fret and it’s A.
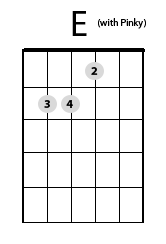
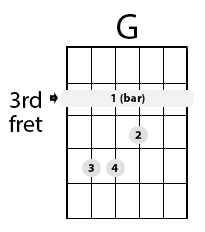
E Minor Shape (6th-String Root)
From the E major shape, lift your middle finger off the 3rd string. Barred at the 3rd fret, that’s G minor.
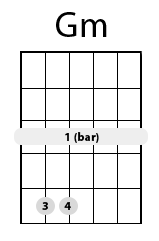
A Major Shape (5th-String Root)
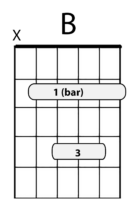
This one is a little trickier, and there are two ways to play it. For the four-finger version, play an open A chord with your middle, ring and pinky fingers. Move it up two frets, barre the 2nd fret with your index finger, and put your middle, ring and pinky fingers on the 4th fret of the 4th, 3rd and 2nd strings. Don’t play the 6th string. That’s B major.
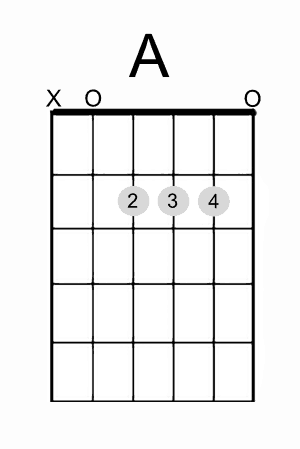
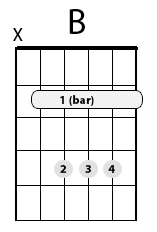
For the double-barre version, barre the 2nd fret with your index finger and the 4th, 3rd and 2nd strings at the 4th fret with your ring finger. Don’t worry if the 1st string doesn’t ring. It’s harder, but I prefer it because it leaves your pinky free for other notes.
A Minor Shape (5th-String Root)
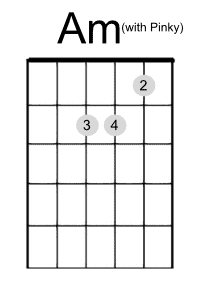
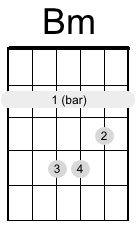
Play an A minor chord with the pinky version of the fingering, then move it up two frets and barre the 2nd fret. That’s B minor: ring finger and pinky on the 4th fret, middle finger on the 3rd. You can play the 6th string, but I’d play just the 5th through 1st.
Barre Chord Tips
Work on one tip at a time, using the G barre chord. If something already feels comfortable, move on.
- Find your spot. Move your index finger slightly toward the ceiling or the floor (not along the fretboard) until it feels best. Everyone’s finger creases land in different places.
- Roll your finger. Roll your index finger slightly onto its side, somewhere between the flat part and the edge. It’s a more natural position for your hand.
- Focus the pressure. Concentrate on the 1st and 6th strings. For most people, if those ring, the rest will too. Then play each string on its own and fix any that buzz.
- Use your posture. Sit up straight, pull your shoulders back a little, and draw the guitar slightly toward you. It takes some pressure off your hand, and you can play longer before getting sore.
5 Ways to Get Past the Barre Chord Barrier
1. Make Your Guitar Easier to Play
The biggest problem is a guitar that isn’t set up well, with the strings too high off the neck. Have a teacher or a good repair person look at it. A setup can lower the action, adjust the neck and smooth the frets. Here’s more on making your guitar easier to play. Very small or very large hands sometimes do better with a thinner or wider neck, but that’s less often needed.
2. Learn the Mechanics
Barre chords take specific know-how: where your index finger sits across the neck, the best wrist angle, where your fingers go in relation to the frets, and how to move between chords. Without it, you’ll be swimming upstream and building habits you’ll have to undo. A good teacher, or a step-by-step video course, shows you how.
3. Practice More Than You Think You Need To
Most players underestimate how much repetition it takes to make your hands do something new. Aim for at least five days a week, about 30 minutes for beginners, with time in each session for barre chords, and think of it as a long-term program. See how much you need to practice.
4. Practice the Right Things
When I ask students at my music school how they practice, many tell me they play for a while each day. Playing what you already know isn’t practicing. Practicing means working on specific techniques, exercises or songs in a step-by-step way. For barre chords, that means exercises that build strength and accurate placement with the least effort, without tension in your hand and wrist.
5. Be Patient
Playing barre chords smoothly comes down to getting your fingers in the right place, having the strength to press down and getting enough repetitions to change in time. I’ve never met a student who couldn’t do it. Keep doing the right things.
5 Ways to Practice Barre Chords Without Boring Exercises

1. Play One, Rest Three
Keep a steady beat with your foot or a metronome, slowly. Pick one barre chord. B minor is a good one, since it’s one of the easier ones and very useful. Play it on beat 1, then take your hand off and re-form it during beats 2, 3 and 4, ready for the next beat 1. Your hand tires less, and you get far more practice placing your fingers.
2. A Song With One Barre Chord
Use a four-chord pattern where only one chord is a barre chord: D, Bm, A, G. I play it at 1:45. Build it in steps:
- Get comfortable with the Bm fingering.
- Change between D and Bm, four strums each.
- Change between Bm and A the same way.
- Play D, Bm, A, four strums each, without hesitating.
- Play all four chords, then add a strum.
It may seem slow, but when you try something beyond your reach you tense up and make mistakes, and your mind records those habits. Keep the challenge just within reach.
3. Swap in One Barre Chord
Take a progression you’d normally play with open chords and replace one chord with a barre chord. Start with G, D, C, G, with only the G as a barre chord.
4. Start High
Play an E minor barre chord at the 7th fret and make sure every note sounds. Move it down one fret and check again. Keep going down a fret at a time until you reach A minor, where you can switch to the open chord. Then do the same from a B major barre chord at the 7th fret, down to open E.
5. Move Three Major Chords Around
I’ve played my version of Louie Louie by the Kingsmen since I was a teenager, with three major barre chords. The original has a minor chord, and the cheat sheet has both. It’s a I-IV-V progression, which makes it a good workout for moving barre chords around. Wild Thing by The Troggs works too.
Download the cheat sheet (PDF) for the fingerings and a suggested strum.
A Barre Chord Exercise for Hand Strength

Long before I teach barre chords, I teach this primer. Do it a few minutes at a time, once or twice a day.
- Lay your index finger across the 1st fret, just behind it, fairly straight and rolled slightly onto its side. Don’t press yet. That light touch, which mutes the strings, is the release position.
- Press down on all six strings and pick only the 6th string. If it doesn’t ring, press a little harder. You can use your middle finger to help for now. When it rings, release to the light touch, keeping contact with the strings.
- Do the same on the 5th string, pressing all six but picking only the 5th, and so on to the 1st string.
- Move up to the 2nd fret and repeat, and keep going through the 5th fret. Then go through once or twice more.
I call this pumping: you press and release on every note, which keeps your hand from tiring as fast as holding it down would. Little by little your barring finger gets stronger, and you learn how much pressure it takes.
It’ll feel awkward at first. That’s normal. You can also start at the 5th fret and work down, since there’s less tension there. If a note doesn’t sound good after a few small adjustments, move on. Don’t get stuck on one note.
Common Questions About Barre Chords
How Do I Play Barre Chords With Small Hands?
The same way someone with big hands does. Stevie Ray Vaughan, Jimi Hendrix and John Mayer all had big hands, and they still had to learn barre chords. Bigger hands usually come with a little more strength, and that’s about it. Lighter strings and a good setup with the strings close to the neck help everyone.
Why Are Barre Chords So Hard?
For the same reason open chords were hard at first: you’re using muscles in a new way. You’re learning to place the barre behind the fret, place the other fingers accurately, angle your wrist, and use the right pressure: too little and the strings don’t sound, too much and you get sore. There’s an emotional side too. After some success with open chords, sounding terrible again can feel like going backward.
Are Barre Chords Necessary?
You could probably work around them, but they’re too useful to skip. Beyond a full F chord or B chord, they lead to partial barre chords and inversions, extended chords, more chord voicings, a better grasp of theory, and more strength and dexterity.
How Do I Make Barre Chords Not Hurt?
Time and practice. Remember how sore your hand got when you first started, and how that eased as you kept playing. Barre chords are the same, and even after a couple of weeks you may notice a difference. Make them a regular part of your practice.
Want more lessons like this one? Try Real Guitar Success free for 14 days.
Tomas,
The title of this post, in my opinion, reduces the quality of the material that you provide. Scores of sites trade on how bad I am – just send me money and you will no longer suck they proclaim.
Your approach differenciated you. As a teacher and guide you make learning fun, based on achieving success by building confidence and skills.
That’s why I subscribed to your course – you were different in your positive approach. You focused on the pleasure of learning.
Alan Wayne
Life Coaching 4 Grownups
North Palm Beach, FL
Thanks for your comment Alan. I’m glad to hear you’re attracted to the pleasure of learning. The reason many marketers use the “pain” approach is because it actually is more effective at getting people to take action. While I prefer the positive approach it seems like a good idea to include both at least occasionally in the title. Of course the point of the article is to point out how to fix it and enjoy playing guitar more. – Tomas
Great video, will be fun to learn.
this is good stuff
Thanks Keshawn. -Tomas
Your comments are thought provoking. I have been playing for going on 2 months, not long and I try to “practice” bare minimum of 30 mins a day to an hour, sometimes longer n weekends. I am worried that I may be wasting my time on practicing the wrong things. Could use some advice. Currently i break my practice into 4 segments;
Segment 1 is warm ups; finger stretches, chromatic scale, pentatonic scale, picking exercise, etc.
Segment 2 is open chords ( I have the most trouble here especially C chord and A – I just bar A I cant seem to get 3 fingers on one fret and at least think I have fat fingers, but probably mid size. C chord is a bear. I spent an hour one day just practicing C chord and Ive been doign it a couple of weeks and feel like Im makign no progress, Ive tried curling up high on strings with 2nd and 3rd finger, etc, using tips of finger, holding guitar straight, elbow in close to body. Nothing seems to make a difference. I practice 10-15 mins on open chords. I am working on switching chords with metroenome but just think my C chords is really holding me back.
Segment 3 I work out of Mel Bay book/ do some Rocksmith or watch and practice out of videos on chords.
Segment 4 Is playing riffs with power chords which is the most fun so far and keeps me interested.
If I have 30 mins to practice I do 30 mins on segments 1,2, and 4. If I have an hour I try to do all 4 and longer first and 4th sessions.
Does this seem ok. Or should I try something else?
Hi Monte,
Your practice schedule looks very well thought out and organize. I’m impressed. You are obviously a very thoughtful and intelligent person.
As for giving you advice on how to improve here’s a few thoughts.
It’s hard for me to say much from seeing this because it’s only a snapshot of where you were when you wrote it. A lot of the learning process involves motion… As what you’ve done before, what you do next, and then what you do next.
I don’t know what you were practicing before the mentioned program and I can’t tell if this is in the correct order, or if it’s in alignment with your goals.
Two important aspects of learning guitar are: 1) learning skills in a progressive step-by-step order, and 2) getting feedback at critical junctures.
Because of the difficulties you described learning the basic chords I suspect that there is something out of whack with either the way your practicing them or with the order of your learning.
That said I want to at least direct you to a lesson on how to work on chords: https://tomasmichaud.com/how-to-play-guitar-chords/
If nothing else this will give you an idea of how a systematic approach words to learning aspects of playing guitar.
It wish you the best Monte, Tomas
Your barre chord chart appears to show fretting all 6 strings even when it’s a 5 string barre chord. Is there a reason for this ?
Hi Jan, when I bar a chord that has the root on the fifth string I always bar across the entire six strings. That six-string note is part of the chord and strumming it sounds fine. If I were playing just the bass note I would hit the note on the fifth string and then perhaps from the rest of the chord. If you prefer to only bar the five strings because it’s easier that’s good also.