

Chords and strumming
Good strumming starts with an arm that keeps moving and one pattern you can play without thinking about it. Here’s that pattern, how to make it sound more like music, and a few pick tips that make your strumming smoother.
This lesson is about the strumming hand. For the basics around it, see how to hold a pick and how to read strumming notation.

Keep Your Arm Moving
Watch a good guitar player strum and you’ll see the arm moving down and up the whole time, even on beats where the pick doesn’t touch the strings. That steady motion is what keeps your rhythm even. Think of a pendulum swinging at a constant speed.
Keep the motion small. Stay within two or three inches above and below the strings, because a big swing takes too long to come back.
Try it with your fretting hand resting lightly on the strings to mute them, so you can pay attention to the strumming hand: down, up, down, up, at an even pace.
The First Strum Pattern to Learn
This pattern is the foundation for many strums in 4/4 time, which means four beats in each measure. It’s one down strum, then three down-ups:
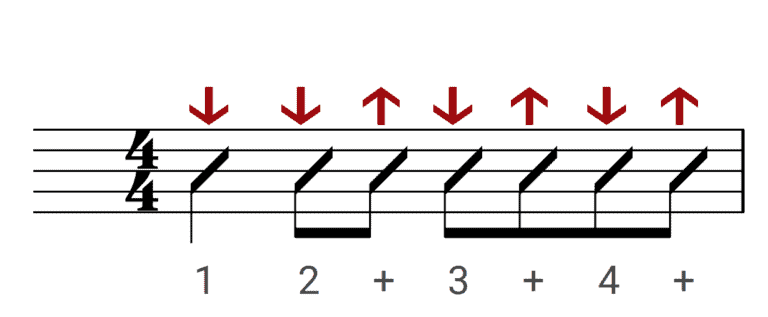
Count it “1, 2 and 3 and 4 and.” Each number is a down strum, and each “and” is an up strum. Say it out loud a few times before you play it.
- Mute the strings and play the pattern until the motion feels steady.
- Play it on a G chord. I use the four-finger G, but any G is fine.
- Now try it on Cadd9. From the four-finger G, move your middle and index fingers over one string each: middle finger on the 5th string, 3rd fret, and index finger on the 4th string, 2nd fret. Your ring finger and pinky stay where they are.
- Play the pattern twice on G, then twice on Cadd9, and keep going back and forth.
On Cadd9, don’t worry about whether you hit the 6th string. Your middle finger usually touches it and keeps it quiet, and if it does ring, the low E is part of the chord anyway.
Make It Sound Like Music
Once the pattern is comfortable, try this. Keep your arm moving exactly the same way, but change which strings you hit. Strum the low strings on some strums and the high strings, about the top three or four, on others.
One way: low strings on beat 1, high strings on the down-up of 2, low strings on the down-up of 3, high strings on the down-up of 4. It creates a rolling motion that sounds livelier than hitting every string every time. Experienced players do things like this all the time.
There’s no one right way to do it. Start with one version and get used to it, and later you can mix it up as you play. If this gets in the way of the main motion, leave it for later. It’s a finishing touch you can add once the pattern feels natural.
Pick Tips for Smoother Strumming
- Let the pick wobble. Hold it firmly enough that it doesn’t fly out of your hand, but loosely enough that it moves a little.
- Angle it with the stroke. Let your wrist turn a little, so the pick angles slightly up on the way down and slightly down on the way up. It glides across the strings instead of digging in.
- Start with a thinner pick. A thin to medium pick, around 0.70 mm, is easier to strum with while you’re learning the motion.
Don’t let these slow you down. Pay attention to them, nudge them a little at a time, and your strumming gets smoother as you go. More in 5 strumming tips.
Where to Go Next
- The bass note strum: a bass note, then a strum, which also teaches you the bass note of each chord.
- One strum built in four steps, from simple to a full pop-rock strum.
- The boom-chicka strum for country and folk.
- Strumming with your fingers, if you’d rather not use a pick.
Want more lessons like this one? Try Real Guitar Success free for 14 days.