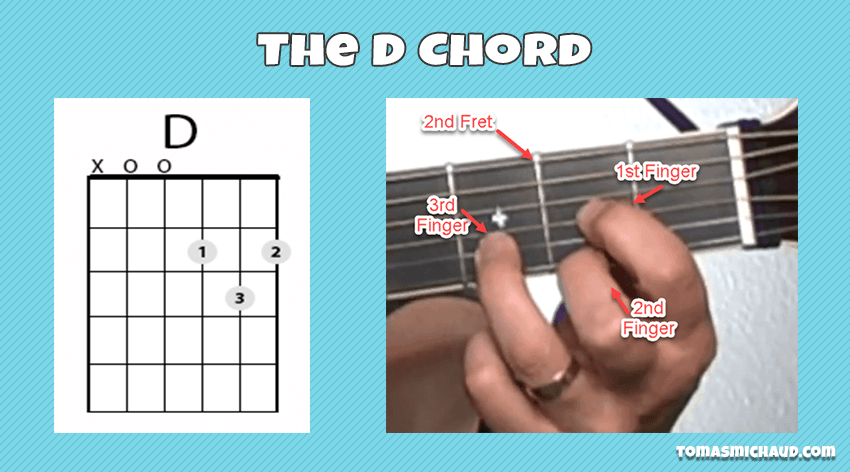
In this lesson you’ll learn how to play your first guitar chords. In the process you'll learn a system for learning chords that will make learning more chords easier.
Chords are important because songs are built from chords. A bonus is that once you learn this first guitar chord it will be easier to play additional guitar chords. Much of the same technique and method of learning will carry the day. Let’s go to the lesson proper.
Fingering The D Chord
I hope you have mastered the numbering of frets and that of the strings because I would refer to strings and frets by numbers in the lesson. To play the D Major chord follow this procedure to get the proper positioning of your fingers on the guitar:
1. Place your first finger (index finger) on the third string, second fret.
2. Place the second finger (middle finger) on the second fret.
3. Lastly, place your third finger (ring finger) on the second string, third fret.

Your finger should be placed behind the fret and not on top of it or too far from it. If the hand is too far back, you would need to apply more pressure to make the string sound.However, if the finger is on top of the fret, no sound would be produced.
Tips To Get A Beautiful Sounding D Chord
1. Use the part of your finger that is nearest to the tip, not the very tip of the finger.
2. Angle your finger up and then back down when placing it on the string (see the image above). Avoid positioning your finger parallel to the guitar because it would be too hard for you to apply pressure that way. Let your finger be slightly bent to easily put pressure between your thumb and finger.
3. Your thumb should be placed at the back of the guitar neck. Though some wrap it around the top of the guitar neck it is advisable for beginners to build the habit of placing their thumb behind the neck. This will make it easier when trying to play chords such as bar chords. This tip also comes in handy if you play jazzy chords because you would need to do a lot of stretching.
Getting Your First Guitar Chords to Sound Good
The next stage, after positioning your fingers, is to strike the strings. Strike the top four strings that corresponds to the chord you are holding (the 4th string is open) and see how they sound.
Can you hear a clear note?
Are they making a “Buzzing” sound (common)?
Are your fingers sore? Your hand?
Don’t get too worried about the quality of the sound produced at first… practice will take care of that.
Aim for the first four strings. Don’t worry if you hit the fifth or sixth string for now. Aim for the top four strings (remember that the top is the highest string).
Now, take your hand off and shake it a bit. Give your fingers a few seconds of rest … and then try it again.

First Guitar Chords Learning System
The key to learning your first guitar chords is to systematically practice them. I'm going to reduce what we've done so far in this lesson to a step-by-step system that I want you to practice for short sessions. Here's how it goes:
Phase 1: Fingering the Chord
- Place your fingers to make the chord. It's okay to place them one at a time if needed. Over time you’ll be able to put all the fingers on the guitar to form the chord at the same time… with practice.
- Look at your fingering and see if the same thing that you can improve very quickly – 5 seconds… 10 seconds tops. Is your thumb in the right place? Are your fingers close to the frets? Is there a good arc in your fingers? Arm relaxed?
- Now take your fingers off the guitar and shake your hand Try to release any tension.
- Start over and repeat the Phase 1 process 10 times. You’re training your fingers where to go and preparing them for the next phase.
Phase 2: Plucked the Strings for Sound
- Start in the same way by placing your left hand fingers to form the chord.
- Pluck the strings one at a time to see other sound. Start with the open 4th string. How does the notes sound? Is in the clear note? Is it buzzing or muted?
- Now make some adjustments and pluck the strings again a few times to see if you can make improvements. You're not going for perfect… Just improvement. Again, spend no more than 10 seconds and do the best you can in that timeframe.
- Now take the fingers off, shake and release the tension. Relax for about 10 seconds.
- Repeat the phase 2 process for 10 times.
This entire process should take no more than five minutes. In the beginning it's better to practice in short bursts many times then for long sessions. If you want to speed things up try doing this several times a day.
There is a Phase 3 to this process of learning how to play guitar chords quickly and efficiently, but that will come in the next lesson when you learn additional chords.
Your Mission If You Choose to Accept It…
Your assignment for today is to practice making the D chord. See how it sounds. You can practice this at regular intervals.
Come back for Lesson #8 and learn a few more chords.
Tell Us What You Think - Please Comment Below!
We would love to hear your comments and questions. What specific things are you struggling with while learning guitar?
