Welcome back. In this lesson, we’re going to apply everything we’ve been working on so far to learn your very first easy guitar song. More importantly than learning the song, however, is learning how to play a song from the guitar music. I’m using this song mostly as an example of how to go about learning some simple guitar songs. Let’s get started.
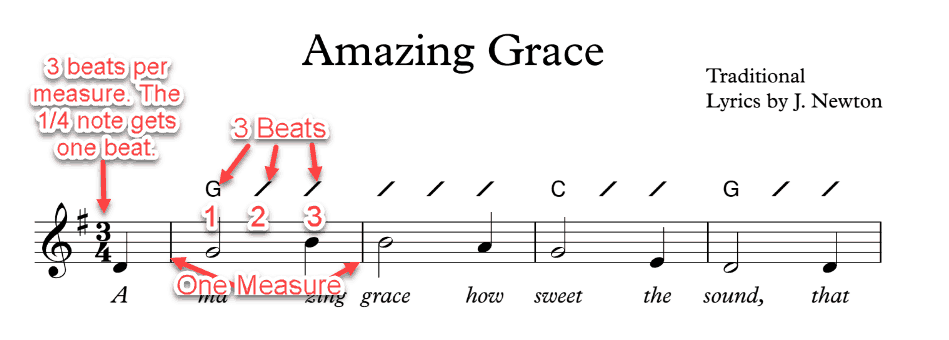
Here's a simple sheet of Amazing Grace. Download this and refer to it as we go through this lesson
How To Play An Easy Guitar Song From The Music
First of all, for this you’re going to need the three chords that we’ve worked on in Lesson #8 More Guitar Chords.
The easy guitar song we’re going to learn is Amazing Grace. I've chosen the song because it's a simple three chord song that most people have heard before. It’s in 3/4 time. That just means that for each measure or bar of the song there will be 3 pulses or beats.

Here’s a couple of things before playing the song:
First, make sure you download the Amazing Grace music sheet, or have it available on the computer screen. It will help you see how the chords line up with the words.
And secondly, I want to give you a little theory. This song is actually in the key of G. We don’t have to go too much into that right now, but one clue that it’s in the key of G is that it starts with the G chord and ends with the G chord. These three chords are often found in the key of G also. More on that later.
Simple Three Chord Song: Amazing Grace
One approach to changing chords at the right place when playing your first beginner guitar songs is to pay attention to the words. Go slowly so you can hear where the change in chords fall with the words.
For this to work you’ll need to be familiar with the melody of the song. Sing or hum the song while strumming the chords. Change chords when you come to the word (or syllable of a word) that corresponds to the next chord.
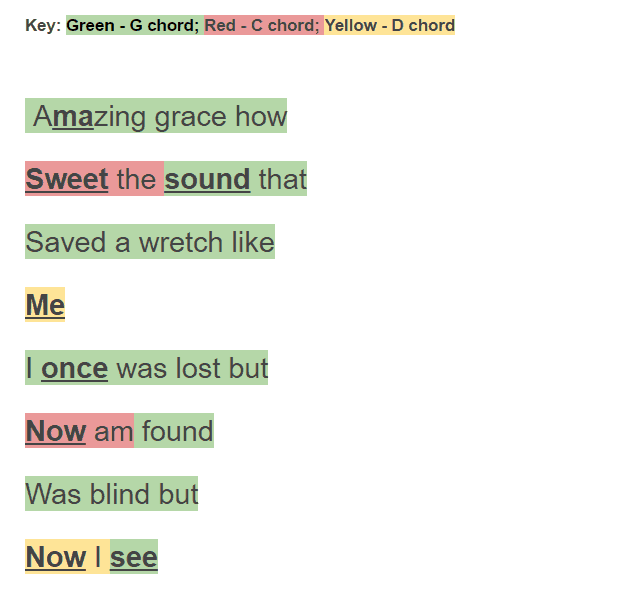
For example, with Amazing Grace you would start off playing the G chord. Then when you got to the word “Sweet” you would change to the C chord.
Now when you get to the word “sound” you would change back to the G chord.
I’ve created a simple color coded version below to give you another way to see this.

For this exercise look at your sheet so you can see which word you’ll change chords on. Try singing or humming the melody while you play to help you keep your place.
Counting Chords And Slashes
Another method when to figure out where to change chords with an easy guitar song like Amazing Grace is to count chords and slashes. I’ve actually put exactly one slash for every beat (strum) for each chord. The letters and slashes on top are the chords. (The notes are for the melody and the words are underneath).
Now for the G chord you’d strum one time down for the letter… then one for each slash until you reach the C chord. Each measure has its own set of chords to strum. A measure is the space between 2 bar lines. This song has a total of 16 measures. Each measure gets 3 pulses (beats)… so 3 strums.
Combining Both Approaches
Try playing the song both ways. Go back and forth to see how they work together. You can try playing the chords along with the words or you can try just counting the slashes. Once you get into it you’ll find that you can hear the melody and hear where the chords are supposed to change… but it takes practice.
Adding A Strum
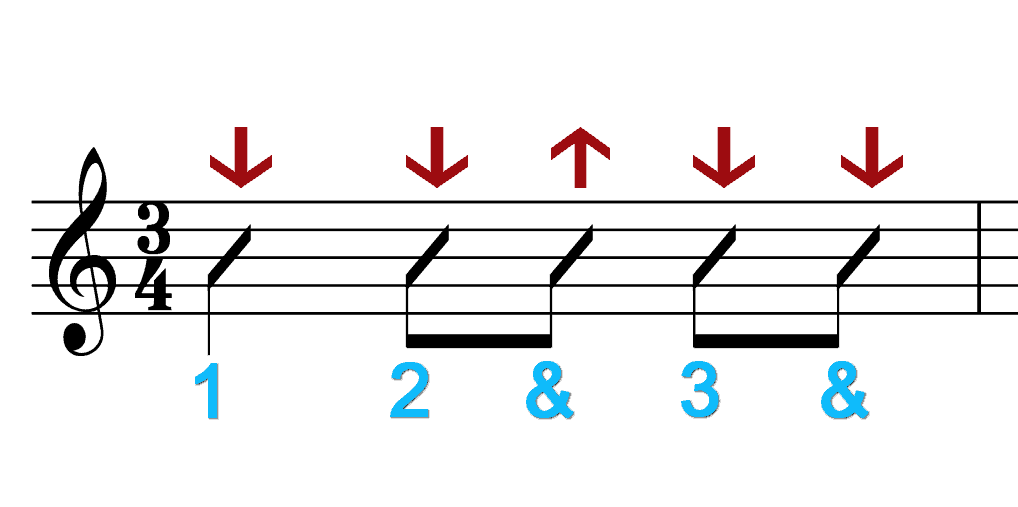
Let’s add a little strum to the song now (only if you’re ready). The strum we’re going to use is: down, down-up, down-up. It’s almost exactly the same as the one we did two lessons back, but now instead of four beats, there are only three beats.

When playing this strum, you count 1 – 2 and 3 and, or down, down-up, down-up.
So now if you’re ready, try playing with the sheet music.
For every slash, you will either strum straight down, or strum down then up. The first beat of each measure will be only a down strum, and the following two will be down-up, down-up.
You can use this same approach for other songs you want to learn.
Using A Guitar Capo
I’ve got one more neat little trick to show you today. I want to introduce you to the guitar capo.

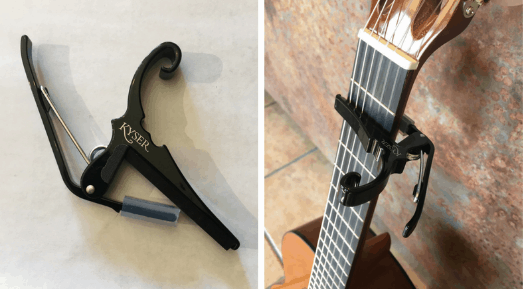
The capo is a very valuable tool to have in your tool kit – both physically and as a musical tool of knowledge. They’re inexpensive and you need to have one.
Capos are used to change the key of a song without changing the chords you’re playing.
The Magic Of Changing Keys
Let’s say that song is a little too low for my voice. I would put a capo on one of the frets, and it can actually raise the pitch of song with the exact same chords.
Formula: 1 fret = ½ step
When I put a capo on my first fret everything goes up one half step. If I put it on the 2nd fret, I’ve raised the song a whole step, and 3rd fret would be one and a half steps, then so on.
Getting A Good Sound
It’s important when using a capo to put it on the right way. Make sure the capo is close to the fret (the metal bar) but not on top of it. Then make sure that all of the strings are covered by the capo and that they make a sound after you’ve put it on; you don’t want any muted strings.
What’s Next?
That’s it for this lesson! Your assignment is try playing the simple song and to get a capo and play around with it for now.
In the next lesson, the final lesson of this series, I’m going to give you some tips and ideas on how how to proceed from here and continue to improve your guitar skills.
See you soon!
Tell Us What You Think - Please Comment Below!
We would love to hear your comments and questions. What specific things are you struggling with while learning guitar?

Thx, easy to follow, easy to learn
Thanks Lolo.
Great lesson!!! I think I can do this! Love the print-outs too…………thank you so much!
You’re very welcome Patricia. -Tomas
Tomas
Should I continue to play even though my fingers haven’t calloused up enough causing muted strings after 3-4 minutes of playing???? my chords are clean before my fingers flatten and grove!!!
Hi Tim. Yes, keep practicing. Don’t worry about calluses. They will take care of themselves. Put your attention on getting the best sound you can by moving your fingers around and adjusting your wrist. I know it can be a tedious process but it works every time if you stick with it. -Tomas
Can I have the simple chords for the song "Can't help falling in love"?
Hi Danilo. This should do it: https://tomasmichaud.com/cant-help-falling-in-love/