Playing the guitar is a lot of fun. And you can start to play full songs knowing just three simple chords. I’ll show you the first of those chords today. then I’ll get you a practice method so you can get up and running with it quickly.
It’s called the G Major Chord… also known simply as the G chord.
The G Major chord on guitar is an open chord. That just means it uses open strings. It’s one of the most versatile and fundamental chords you’ll learn. And it sounds pretty awesome on guitar.
There are a few ways to finger the G chord. I’m going to show you a version that may look difficult at first but is easier and more versatile than others. This is especially true when you begin switching to other common chords.
The G Major Chord Step-by-Step
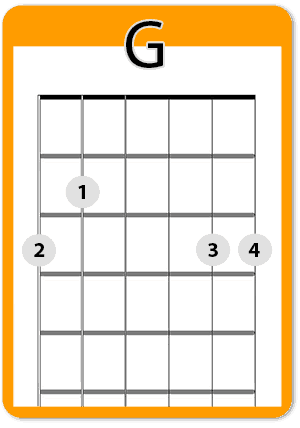
If you’d like a review of how to read a chord diagram check this short lesson.
Let’s form the G Major chord in 3 easy steps:
Step 1:
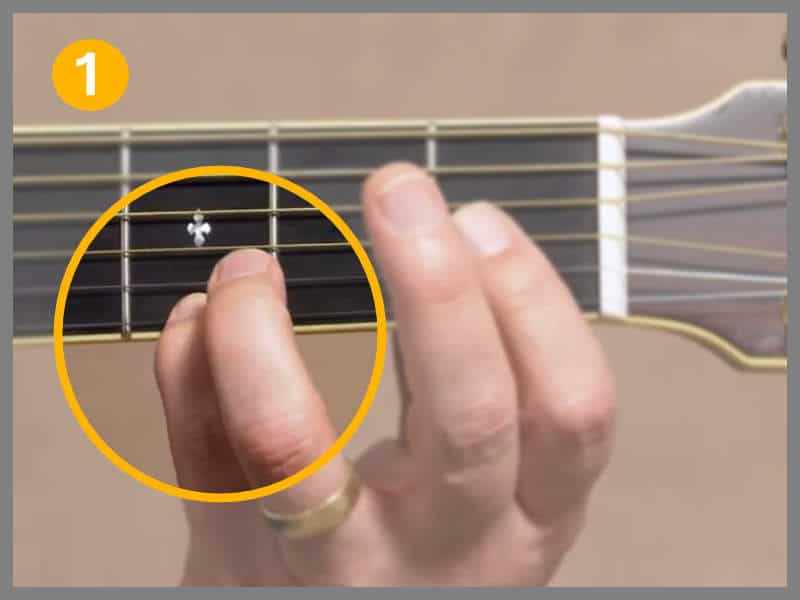
Place your pinky on the 3rd fret of the 1st string. Then place your ring finger right above it on the 3rd fret of the 2nd string. Use them both to support each other for better stabilization.
Step 2:
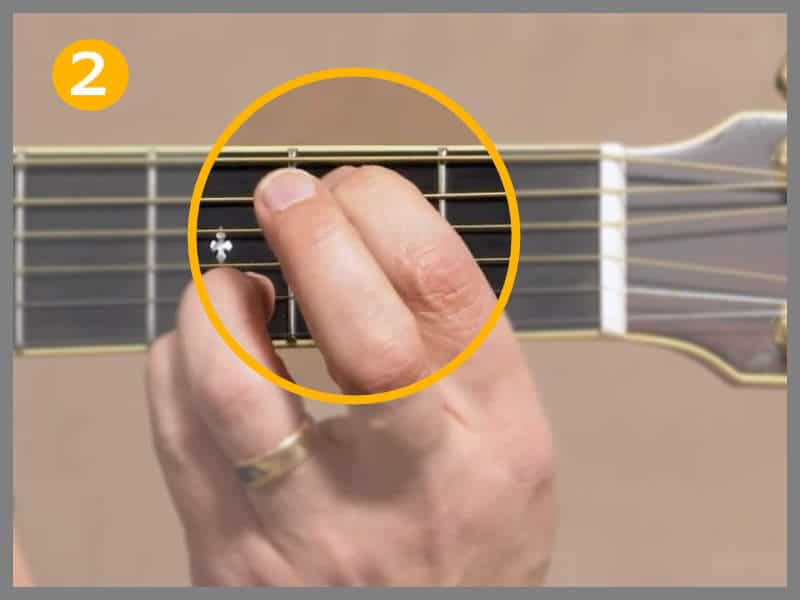
Place your index finger on the 2nd fret of the 5th string. Make sure it’s not touching the 4th string since that will be an open string.
Step 3:
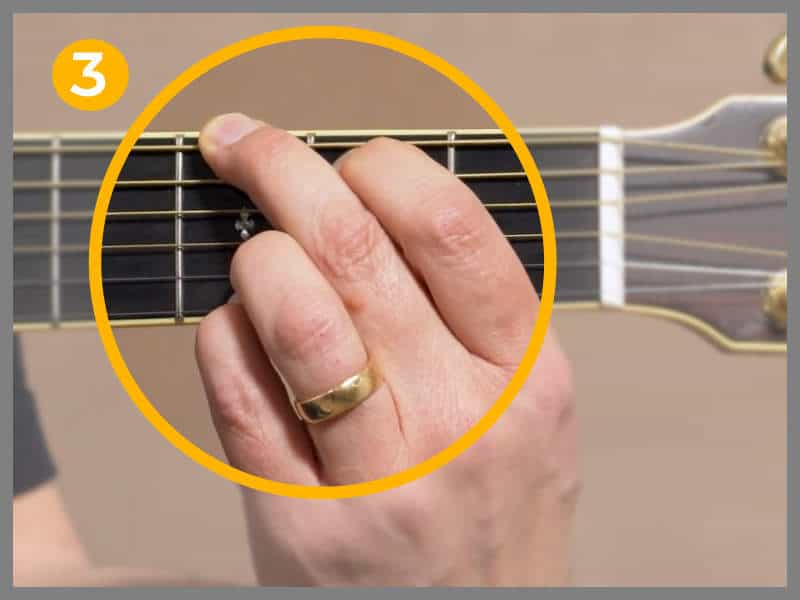
Lastly, place your middle finger on the 3rd fret of the sixth string. Making sure not to touch the 5th string with it. The 3rd and 4th strings will be played open. This is the G Major chord!
Check each string one at a time. How does it sound?
If you have some dead notes or buzzing, check out this next section.
How to Fix Bad Sounding Notes
It’s extremely common to have notes that buzz or don’t ring out when you first learn a chord. And you might have some on this G chord. Here are a few tips to get clean sounding chords.
- Get your fingers close to the fret, but not on it. The closer you get to the fret the clearer the note will sound. If you’re too far away you might get buzzing.
- Make sure to fret with your fingertips. It’s easy to accidentally mute another string because your fingers are a little flat.
- Adjust the angle of your wrist. If you still get some dead notes, try to angle your wrist in a different way. A good cue is placing your thumb in the middle of the neck. That forces your wrist into a better position.
- Make small adjustments. Most of the time it’s as simple as making a small adjustment to how you’re fretting. Find the bad note and adjust from there.
- Take a break for a few minutes. If you’re getting stuck then just walk away. Come back in a few minutes and try again. You’ll be amazed at how much a 5-minute break can help you reset!
Why Start With This 4-Finger G?
You might find it surprising that the 4-finger G chord is easier than other options. It sounds backward, I know. The challenge with the variations of the 3 finger G chord is you either:
- Use your pinky without the support of your ring finger
- Have to stretch farther by only using your ring finger
- Have to stretch farther with less dexterity by only using your pinky
When you play a 4 finger G chord you have your ring and pinky fingers supporting each other. These are the two weakest fingers for most people. So using both of them makes it much easier to fret the notes.
In addition, you’ll often find yourself switching from the G chord to either a C chord or a D chord. It’s easier to switch from this version to both of these chords.
How to Practice the G Chord
Now that you know where to put your fingers you’re probably wondering how you’re going to remember where they go and how to get there quick enough to be useful. Not to fret (pun intended). The solution is a simple muscle memory exercise that you can practice along with in this Play-Along video.
The Press And Release Exercise
- Form the chord and release. Form the chord and release it again. Repeat a few times.
- Form the chord and strum. If it sounds clean, release and strum.
- If it has any bad notes adjust until it sounds pretty good. Then strum and release.
Do this for a few minutes and take a break. The more you practice the easier it becomes. If you do this a few minutes several times each day it will speed up your progress tremendously.
And lastly, the absolute best way to practice chords is to play them with other chords in common chord progressions. That’s exactly what we’ll do in later lessons in this series.
What If My Hands Are Too Small?
This is actually a pretty common concern. If your hands are exceptionally small you may want to consider purchasing a guitar with a narrow neck. Some of my small-handed students are happily playing what’s called a three-quarter or a travel size guitar.
At the same time consider that even though you may think that a physical problem is keeping them from fingering a chord, it’s more likely you’re underestimating what you can do with practice.
Learning to play the guitar is quite awkward at first for everyone! You’re using your hands and muscles in a way you haven’t used them before.
Over time you’ll build the strength and dexterity you need to easily finger this chord and many others. The more you practice the quicker this happens.
And… It’s not uncommon to see children play full-size acoustic guitars.
Just sayin’ 🙂

Tell Us What You Think - Please Comment Below!
We would love to hear your comments and questions. What specific things are you struggling with while learning guitar?
