This is the second lesson in my series Fingerpicking Magic. If you haven't watched the first lesson yet head on over to Fingerpicking Magic Lesson One. It's important that you understand the basic concepts in the first lesson before practicing the chords and the chord changes in this lesson.
Fingering The D Minor Chord
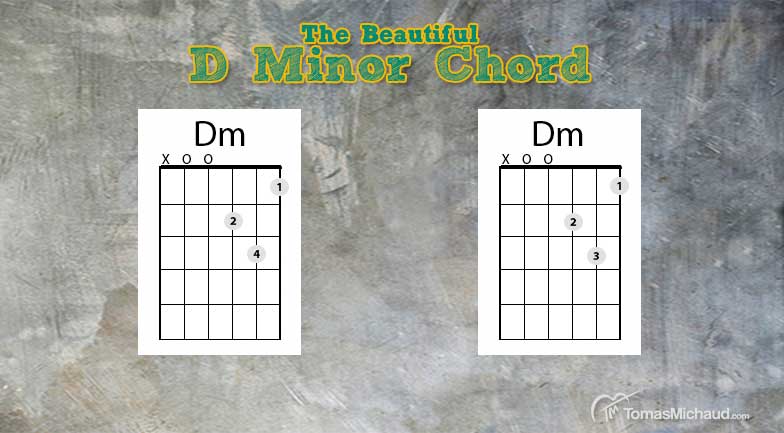
In this lesson we will be using the D minor chord. If you're not familiar with that chord it would be best to practice it first. To play the D minor chord put your first finger on the first string, first fret. Now stretch your second finger over to the third string, second fret. Finally place your pinky on the second string, third fret.
An alternate fingering for this chord is to use your third finger in place of your pinky. In other words your third finger is on the second string, third fret. I usually prefer the version with my pinky but they are both useful and there is no right or wrong.
Do I Need Fingernails For Fingerpicking?
This is a common question I get from students learning to fingerpick. The short answer is you do not need to have nails to do fingerpicking. Now for the longer answer 🙂
When you fingerpick without nails the sound is softer and less distinct. What I mean is that the individual notes are not as clear. When you use nails it adds a little bit of bite to each note and makes it clearer and more distinct. To some degree it depends on the style of music you're playing, but generally I prefer the sound with fingernails.
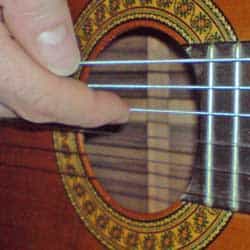
Now to be clear I'm not actually picking just with my nails. I'm hitting the string with the flesh of my finger first and then the string to rolls off the tip of my nail. In essence I'm using both the fleshy part of my finger and the nail to get the sound I want. If I use just the nail the sound would be very tinny and not very pleasant.
To do this properly not only takes lots of practice but you'll need to shape and smooth your nails regularly. I recommend if you're just starting out to practice without nails. As time goes on you can decide if you want to grow your nails and shape them in the appropriate way for fingerpicking.
As a side note: if you want to play either classical or flamenco guitar properly you would definitely need to grow your nails and learn to shape them properly. It is not uncommon for a good classical guitar teacher to spend an entire session or two on shaping your nails properly.
Understanding The Written Musical Notation
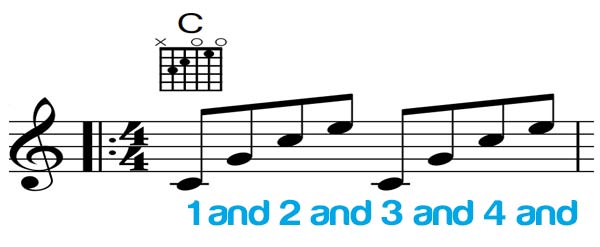
In the video I count: one and two and three and four and. Each of the numbers indicates one note and every time I say "and" I'm indicating one note also. This is a common way of talking out eight notes.
If this is new to you it would help to watch my video Understanding Musical Symbols.
Preparing For Fingerpicking Exercise #2
It's helpful to practice some of the individual chord changes with the fingerpicking pattern before tackling the full exercise. Try this:
- Practice playing C to G with a simple straight down strum. Strum the C four times, then switch to G and strum it four times. Use either your thumb or a pick and strum straight down. Practice changing chords without slowing down or speeding up. Spend just a few minutes on this before doing the next step.
- Practice C to G with fingerpicking. Now do the same thing with the fingerpicking pattern. Play slowly and again be sure not to slow down when you change chords. Now you’re practicing changing chords and fingerpicking at the same time.
- Repeat the process with D minor to G. Now do the same thing with these two chords. First practice changing with a simple straight down strum. Then practice using the fingerpicking pattern.
If you spend just a few minutes on each of these steps it will help you tremendously when you practice the entire exercise.
Time To Practice The Entire Fingerpicking Exercise
Now that you are prepared properly it's time to play the entire exercise.
I recommend playing the exercise several times through before trying it along with the video. It does help to watch the video first so you have a good mental image of what you're trying to do.
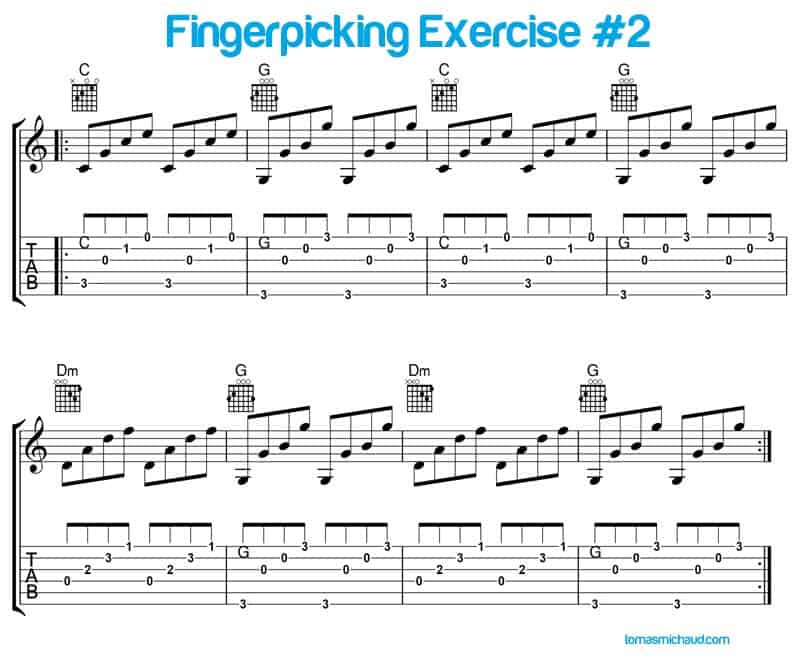
Some Guitar Practice Reminders
Even though it's a little bit difficult to play the exercise slowly at first it's important to get the proper technique. Pick up the speed little by little. If you find that your technique is starting to get off track it's time to slow down again and work on it.
The other important aspect of practicing these exercises is to keep from getting really tense. Now it's probably impossible to stay completely relaxed but you want to keep working at breaking the tension before it gets too bad. If you're right hand gets really sore it's time to take a little break and come back at it later.
Did you find this lesson Helpful? Leave a comment below.


Thank you for the lesson. I really like your teaching method that stresses practice and patience. It helps to know that practice at one’s pace helps to gradually work up to the speed and correct tempo.
Tomas thank you once again for this lesson. Will be practicing it and will look forward to your next one. Happy Holidays!
Great stuff Tomas, brilliant introduction to Fingerstyle guitar.
I’m glad you liked it Get. -Tomas