One of the biggest problems with learning fingerpicking occurs when students try to do something that's more difficult than they can do accurately considering their skill level. This almost always causes them to tense their hand. This tension becomes a habit that’s difficult to break.

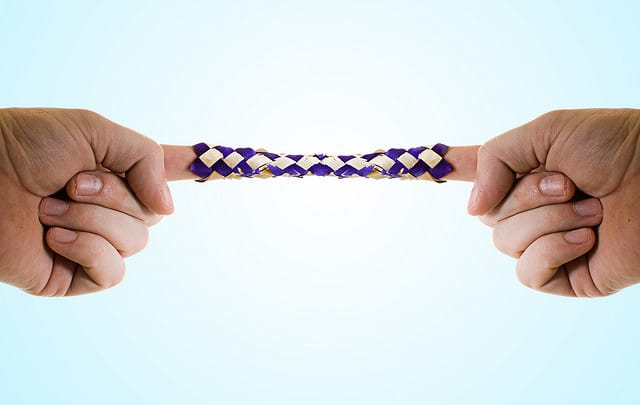
It’s kind of like one of those Chinese Finger Traps where you stick your fingers in a little wicker tube. The harder you pull the more the tube tightens on your fingers. With fingerpicking you want to push yourself to get better but you cannot play smoothly and easily unless your hands are relaxed.
The solution is to start with simple exercises using proper technique and hand position. Then pick up speed and complexity little by little while keeping your hand relaxed.
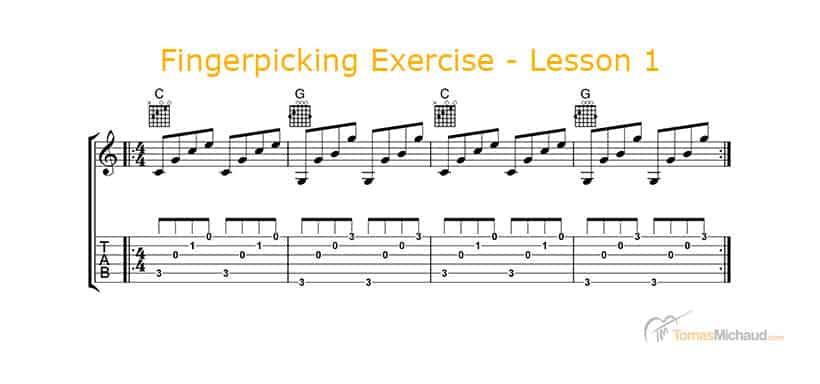
In this lesson I’ll show you a simple exercise that you can use to practice using the C chord and the G chord. We’ll also use the thumb and all three fingers on the right hand. Remember to be patient and just take it step-by-step.
What The Heck Is P I M A?
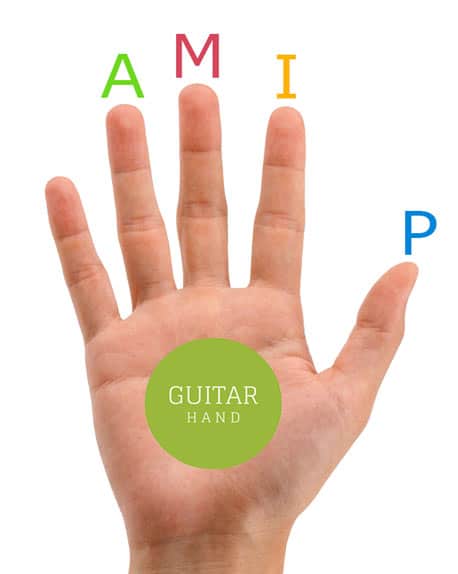
To talk about which fingers in the right hand to use we’re going to label them. This is a system that gets its roots in classical guitar. The letters are referring to Spanish words. It's a system that's been around for many years and seems to work well. Let's go with it.

P – Thumb (Pulgar)
I – First or index finger (Indice)
M – Middle finger (Medio)
A – Ring finger (Anular)
Basic Fingerstyle Guitar Technique
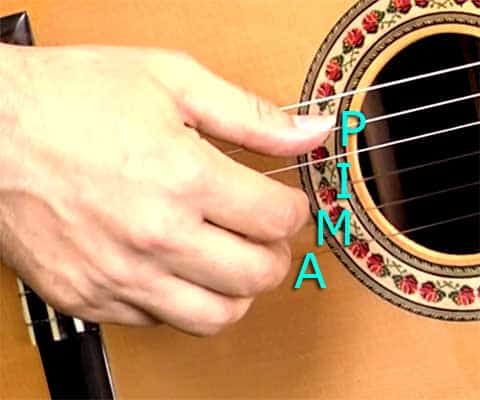
To get started place your thumb (p) of the right-hand on the fifth string of the guitar. Now place the first finger (i) on the third string, middle finger (m) on the second string and ring finger (a) on the first string. Have your fingers resting on the strings with your hand relaxed and fingers slightly bent.
Let's practice the basic movement in the right-hand. Don't worry about any chords in the left and yet. Push your thumb down through the fifth string until it comes to rest on the fourth string. Pull the first finger through the third string toward the middle of your palm. I like to think of pulling “through” the string on the way to your palm as opposed to “pulling “on” or “out”.
Now pull the middle finger through the second string toward the middle of your palm. Stay relaxed. Finally pull the ring finger through the first string.

The basic movement is that the thumb presses down and the fingers pull gently into your palm with just enough energy to play the string with a nice clean motion. The entire hand days at pretty much the same distance from the strings throughout this motion.
It's important to note that the entire hand does NOT pull away from the strings to make the sound. This “bouncing”motion that many beginners do makes it difficult to play smoothly. Just pull your fingers gently into your palm. Then replace all the fingers including the thumb and start over.
"Your hand should stay even to the strings as your fingers pull into your palm. Avoid the temptation to let your entire hand bounce up and down from the face of the guitar.”
Time To Practice With Guitar Chords
After you’ve spend some time practicing the basic movement it's time to try it with some chords. Start by making the C chord in your left hand. Now place the fingers in the proper position on the right-hand. Press this thumb through the first string and then each of the fingers one at a time starting with the first finger.
Now replace the fingers and repeat the same pattern. First the thumb, then first finger, second finger and third finger. Repeat this a few more times and see if you can began to reduce the time it takes to replace all the fingers on the strings in the right-hand.
The idea is to get a fluid motion. You want to get a slow steady pulse going with no hesitation between each of the notes.
Now Let's Go On To The G Chord...
Finger the G chord in your left hand. Though there are many ways to finger the G chord any fingering that you prefer is fine for this exercise.
Place the thumb on the sixth string. That's where the root note of the G chord is… the G bass note. Placed your fingers on the top three strings like you did with the C chord… first finger on the third string, middle finger on the second string and ring finger on the first string.
Now press the six string with your thumb and pull off the fingers one at a time with an even motion. Replace your fingers and thumb. Repeat this entire process several times. Again you’re trying to get the motion even and without hesitation. Go as slow as you need to.
Let's Change Chords
Now for the fun part. You're going to play each chord two times then change to the next chord. Here’s what one time looks like: thumb, first finger, middle finger and ring finger. That's four guitar notes. Do this motion two times, then move to the next chord.
Okay, here goes.
1. Place your left hand on the C chord and your right-hand in position. Remember the thumb goes on the fifth string for the C chord.
2. Pluck all four notes, replace the fingers and pluck all four notes again.
3. Now change the left hand to form the G chord. Place your right-hand in position with the thumb on the six string.
4. Pluck all four notes, replace the fingers and pluck all four notes again.
5. Rinse And Repeat. Go back to the C chord and repeat the process.

A Few Tips
Go slow and try to get the notes as even as possible. You'll probably find that the most difficult parts to keep even are 1) placing your fingers back on the strings, and 2) when you change chords. In the beginning you'll need to work on the right-hand first and get comfortable with the motion of plucking the strings and replacing the fingers. Little by little with practice it will become one fluid motion.
It will be easier to focus on changing chords smoothly once the right-hand is more coordinated. Be patient with yourself… but persistent. Keep coming back at it a little bit each day. Check in with your right hand regularly to make sure you're staying relaxed. Stop and shake out your hand if you need to… then start up again.
Persistence Is The Key
There was a time when I could just barely imagine what it would be like to play simple fingerpicking patterns without struggling and straining. Now I can play complex fingerstyle patterns without even thinking about my right hand. It's just a habit they came from years of practice and playing the guitar.
I want you to know that you can do this just as well as I can. You do need to make a choice somewhere along the way to just keep coming back at it… persistence!. What seems difficult gives way to repetition.
The tips that I've given you and the method for practicing are meant to shorten the process. I want to give you the benefit of my experience. I believe you can get to the same place quicker than I did if you take advantage of my experience.
But whether slow or quick if you are persistent you will play beautiful fingerpicking patterns on the guitar and not only impress your friends and family but have a wonderful time doing it.
Did you find this lesson Helpful? Leave a comment below.


Great tips, as always! I’ve been practicing finger-picking daily for 6 months now with classical and traditional folk music. My right hand is doing fine, but my left hand needs h-o-u-r-s more practice for the more difficult chord changes. I’m using your system and tips, for the F chord too (!) and I’m getting there, slowly but surely, after lots of adjustments! I just recently learnt the Travis pick and love it. Love your Facebook posts, when there’s time to read them between practice, work and sleep! So grateful for your encouragement.
Thank you. I am interested in playing more than just chords. Instrumental and eventually flamenco.
Tomas,
This is a great lesson for someone struggling as I am with old fingers, old brain but thanks to you, some continued “persistence”. Your generous comment that we, as your eager students, will someday do this exercise as well as you do is highly encouraging but somewhat difficult to accept. But the encouragement is appreciated as well as your views that sharing your knowledge and skills with us may shorten our journey somewhat. I hope so. At this age, I don’t have time to waste! 🙂
Two nice lessons Tomas. Sunday morning here and I practiced over 4 cups of coffee. Triplets sound so nice-a good sounding correct run comes and goes-seems to improve when experimenting with best hand position. I’ll get there. 😉
Been on holidays in U.S. for last three months. This is the the email I open daily. I hope this is the info you were looking for.
mr. toms I really love your lessons tanx alot to you.but I have a question to ask which is can I use my classic guitar to learn bass guitar?
i love fingerstyle but im struggling with it. how do you keep hand steady while picking??
educational tips keep up the good work
Thanks Chester. -Tomas
This is great , i’m really getting into this now!
Thanks Brian. That’s good to hear. Fingerpicking can be a lot of fun once you get the hang of it. – Tomas
I’m happy to hear that Brian. -Tomas
I really enjoyed your video. I practiced along with it. It was very helpful. Truly for the beginner. Your instructions on how to pluck the strings was just what I needed! I’m doing it correctly now, nice, smooth, and easier. Thank you!
Your beginner lessons are easily understood and really teach as if an instructor were in my front. Howevet, I only use the Do Re Mi system and not interested in the EGBDF FACE system. The PIMA designations are very helpful and easily remembered. And I learned something new. I learned to name the middle finger "medio". I always knew them as dedo pulgar, dedo indice, dedo del corazón, dedo anular and dedo meñique. It is much easier and logical (indeed it is in the middle) to use dedo del medio instead of dedo del corazón.