Updated February 2020
Let’s face it, barre chords are tough.
For many beginner guitar players, they’re the first major hurdle. I’ve even known people who have avoided them for years!
But here’s a secret: barre chords aren’t as hard as you might think. At least if you’re equipped with the right tools.
This is a tried and true method to make barre chords much easier to learn. It’s a simple step by step approach that will:
Strengthen your fretting hand so barring becomes easy
Increase your dexterity to play without dead notes or buzzing
Get you playing barre chords faster so you can play your favorite songs
It also takes a lot of the frustration out of the process. Instead of trying to force a full barre chord we’ll build one. In manageable steps that will give you several chording options. Options you can use today.
So let’s start by building a barre chord.
How To Play Barre Chords
Barre chords don’t have to be a daunting task.
In fact, there are simple and effective ways to work up to a barre chord. Here is a tried and true step by step guide to playing barre chords faster.
1. Start With The Power Chord. Let’s start with a power chord. Power chords are the foundation of most barre chord shapes and are very useful on their own. Here’s how to play a power chord.
- Start by placing your index finger on the 3rd fret of the 6th string
- Next, place your ring finger on the 5th fret of the 5th string.
- Lastly, place your pinky on the 5th fret of the 4th string.
Here’s what the chord looks like:
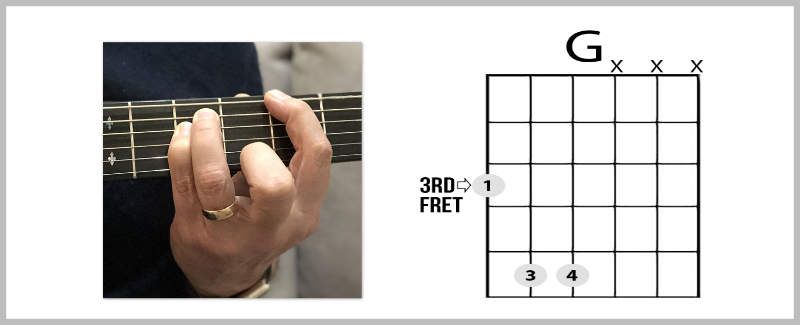
Give those three strings a strum. How does it sound?
Notice how my fingers are close to the frets but aren’t on top of them. If you’re too close or too far from the fret you’ll get some buzzing.
This is what is called a G power chord.
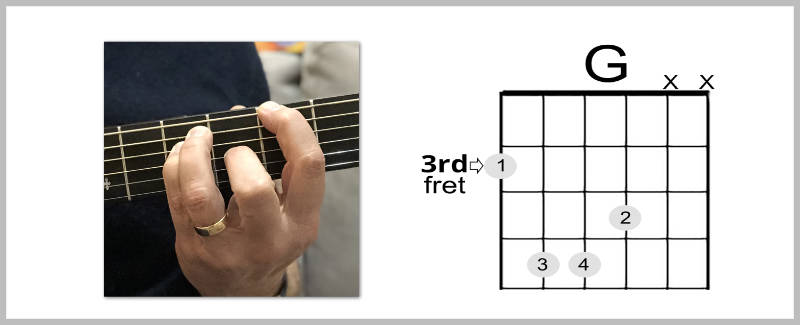
2. Add More Fingers. Once you have the power chord down you’re ready to add more fingers. This is what I like to call a faux barre chord.
- Form the G power chord we just learned.
- Next, place your middle finger down on the 4th fret of the 3rd string.
This might be a little bit of a stretch for your hand. Try making the shape a few times before strumming. The strum those four strings and listen. Make adjustments if needed and strum again.
3. Strengthen The Barre. This technique has helped many of my students with playing barre chords. It’s a great way to strengthen your barring finger.
- Take your index finger and barre the third fret, all six strings.
- Your finger won’t be completely flat. It will roll to the side just slightly.
- Press down and release without strumming. Press down and release again. Do this several times.
- Once that feels OK, press down and strum all six strings. If you get any buzzing, try to adjust and strum again.
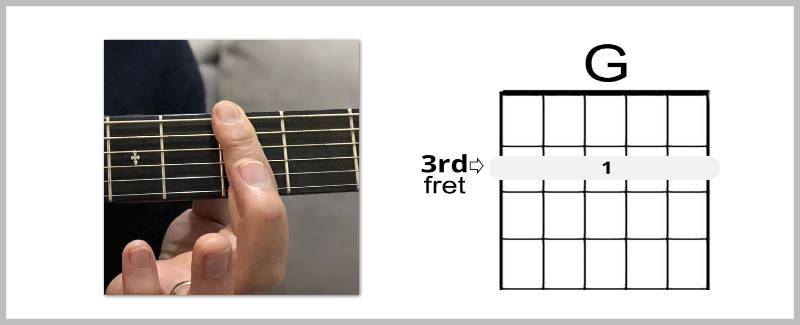
It might take some time to get the notes to ring clearly and that’s ok! Do this for a few minutes a day. You’ll quickly notice how much stronger your finger gets.
4. Put It Together For A Full Barre Chord. A barre chord is the combination of the faux barre chord and the index finger barre. Once you know both you’re already 80% of the way there. Let’s put them together and form a G barre chord.
- Make the faux barre chord just like before.
- Bring your index finger down to a full barre on the third fret. Adjust your hand and wrist as you need to.
- Strum all six strings. How does it sound? If you get any buzzing, adjust your fingers slightly.
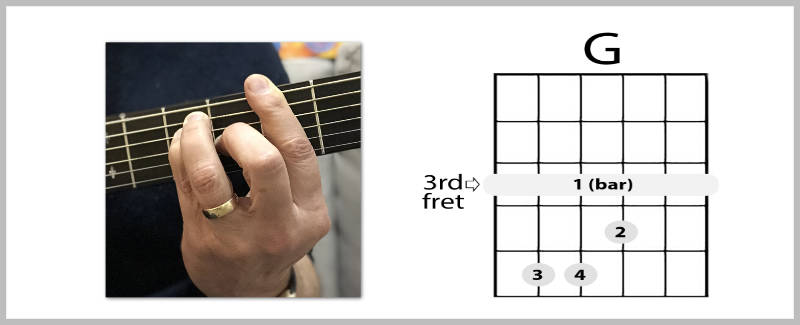
It’s OK if it doesn’t sound perfect right away. You might find it easier to make the barre and then make the chord with the rest of your fingers. Try it both ways and see what works best for you.
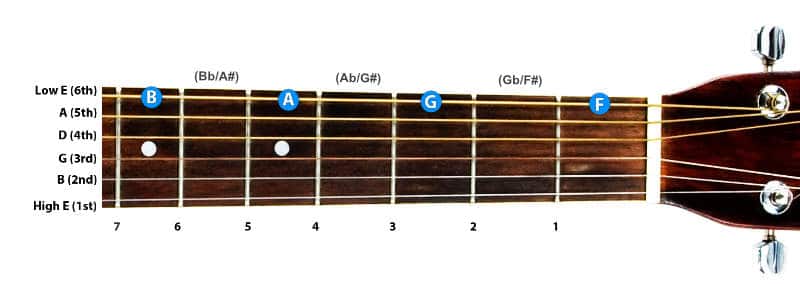
5. Learn Note Names On The 6th String (Root Notes). This barre chord shape is moveable on the 6th string. The note you start on is called the root note of the barre chord. Let’s do a simple exercise to memorize the notes on the 6th string.
- It’s easier to learn where the natural notes are. The image below has them up to the 7th fret.
- Once you know the natural notes, you’ll know the flats are one fret below, and the sharps are one fret above.
- Notice that the E goes straight to F, and B will go straight to C. There aren’t any sharps or flats between these notes.
- Play each natural note up to the B, saying the note name out loud. Then go back down.
RGS Members:
Download your copy of the Barre Chord Chart <<
Not a member yet? No problem. Learn how to get free access.
6. Practice Common Chord Progressions. Let’s use the G barre chord in a common chord progression. This is a progression that’s used quite often in many genres. This is a great way to work on barre chords and ear training at the same time.
- Play G-C-D-C, four strums per chord.
- This is called a I-IV-V-IV (one-four-five-four) progression. Use a metronome at a slow tempo to stay in time.
- Gradually increase the tempo once you’re ready.
Once you’re comfortable with the progression you can add in your favorite strumming pattern.
Barre Chord Shapes
As odd as it may sound, barre chords are basically open chords moved up the neck.
You could capo your guitar and play the same open chord shapes you already know. With barre chords your index finger acts as the capo.
These four basic barre chord shapes are movable chords. You can play them anywhere along the fretboard to produce different chords.
With just these four barre chord shapes you’ll be able to play every major and minor chord!
E Major Barre Chord Shape
This is the shape we learned in the “How To Play A Barre Chord” section. It’s used on Major barre chords starting on the 6th string. Let’s take a look at this chord through the lens of an open E Major chord.
- Form a standard E Major chord.
- Now, instead of the traditional fingering, try playing the “pinky” version like this:
Your index finger should be unused. Now slide this whole thing up three frets so your index finger is barring the 3rd fret.
Does that look familiar? It’s the same chord we just learned, the G barre chord. But we call it an E Major shape because it’s an E Major chord moved up.
This is a 6th string root barre chord shape. The chord name is the root note on the 6th string.
The 3rd fret of the 6th string is a G, so this would be a G Major barre chord.
If you move it up 2 frets to start on the 5th fret, it would be an A Major barre chord.
Em Barre Chord Shape
The next shape is also a 6th string barre chord shape called the Em barre chord shape. This is almost the same as the E Major barre chord shape. Let’s start by forming it from the open Em chord.
- Form the “pinky” E Major chord we just learned and lift up your middle finger from the 3rd string 1st fret.
- This is a “pinky” Em chord. Now, move this up three frets so your index finger barres the third fret.
.
This is a Gm barre chord since we’re starting on the 3rd fret of the 6th string (G). You can also think about this as the E Major barre chord shape without your middle finger.
A Major Barre Chord Shape
The E Major and E minor barre chord shapes were both 6th string root chords. Now let’s look at the two 5th string barre chord shapes.
The first one is the A Major barre chord shape. This one is a little tricky, but I have a couple of tips that will help. There are two ways to play this; the four-finger barre and the double barre.
Let’s look at the four-finger barre chord first, using the B Major chord as our example:
- First, play an open A Major chord. But instead of using your index, middle, and ring fingers, play it with your middle, ring, and pinky fingers
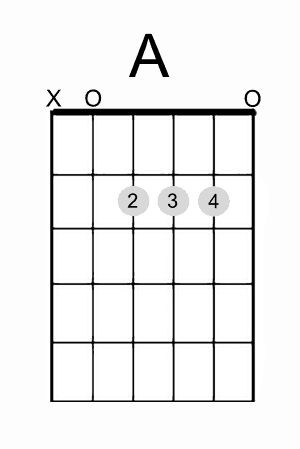
- Now move this up two frets, and barre the second fret with your index finger.
- Take your middle, ring, and pinky fingers and play the 4th fret on the 4th, 3rd, and 2nd strings like the image below.
- Don’t fret the 6th string.
This one makes you stretch your fingers a bit more, but it’s a little easier to play. The second version is the “double barre”, or “partial third finger barre”.
- Start by barring the second fret just like in the four-finger barre chord.
- Take your ring finger and barre the 4th, 3rd, and 2nd strings on the 4th fret.
- Don’t worry if the 1st string doesn’t ring out.
This one is definitely the more challenging one! But I prefer this because it leaves your pinky open to play other notes.
Am Barre Chord Shape
The last of the shapes is the Am barre chord shape. The great thing about this is that you’ve already learned it! It’s the E Major shape moved over one string.
- Start by playing an Am chord, but using the “pinky” version.
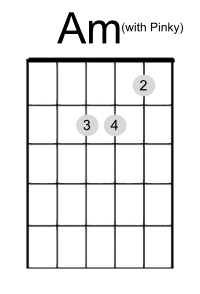
- Move this up two frets so your index finger is barring the 2nd fret. This is a Bm barre chord.
- Your ring and pinky fingers should be on the 4th fret, and your middle should be on the 3rd fret.
- You can play the 6th string here, but I would recommend just playing the 5th through 1st strings.
With these 4 barre chord shapes, you now have a whole world of major and minor chords at your fingertips (literally)!
Barre Chord Tips
By now you know how to play a barre chord. It might not sound perfect but you have the basic technique and shapes. Remember, just like everything with guitar it’s a journey and a process.
But there are a few extra tips that will make this journey and process a little easier. I’m going to use the G barre chord as my example for these tips.
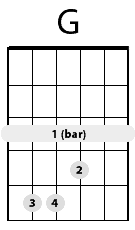
1. Index Finger Position. Move your finger up or down to find the most comfortable spot on the fret. That’s up or down towards the ceiling or floor, not up the fretboard. Every finger is different and the creases can land in odd spots on the string.
Go ahead and barre that third fret. Now reposition your finger and barre it again. Find the spot that feels the best for your hand.
2. Roll Your Finger. Your index finger shouldn’t be perfectly flat on the fretboard. Roll it just slightly so the side of your finger is fretting the strings. Somewhere in between the flat part and the side of your finger. This will let you play the chord in a more ergonomic way.
Just like in the first tip, try this out on the G Barre chord.
- Find your index finger position
- Slightly roll your index finger
- Fret the rest of the chord
- Give it a strum
Experiment a little and find that sweet spot for you.
3. Focus The Pressure. One cue that can be helpful is to focus the pressure of your barring finger. Focus more on the 1st and 6th strings. For most people, if these sound good, the rest of the chord will too.
Give it a try. Form the G barre chord and focus on the outer strings. Make sure the outer strings ring clearly. Then play each string one at a time.
Were there any notes that sounded muted or buzzy? Fret the chord again and focus on the strings that didn’t ring clearly.
4. Use Your Upper Body. This sounds a little odd but it will help more than you think. If you’re sitting down, start by sitting straight up. Pull your shoulders back a little, then pull your guitar towards you just a little.
Better posture will help you play longer without getting as sore or tired. It also takes a little bit of the pressure off of your hand.
These techniques may seem like a lot of information right now. Don’t worry too much about remembering every small detail. Try to focus on one technique at a time.
If your barring finger is already comfortable, move on to the next tip. If your barre chord sounds great already, move on to the next section.
Pretty soon this will all be natural and you won’t have to think about any of it!
5 Ways to Improve Barre Chords
One of the most common issues when learning to play guitar that I've encountered with students is a general grumbling about barre chords.
And rightly so. Most students struggle with buzzing notes and a sore hand and wrist.
In this section I want to narrow down the main reasons for difficulties with bar chords.
But more importantly I want to give you the clear guidance on how to get through it and play beautiful sounding bar chords.

Here are the most significant ways to help you break through that "Barre Chord Barrier".
1. Make Your Guitar Easier To Play
There are times when you need to consider making changes with your guitar.
I briefly mentioned that if your fingers are exceptionally small you may want to consider a guitar with a thinner neck.
Occasionally there are times that is helpful to have a guitar with a wider neck if you have exceptionally large hands.
Many times it's not really necessary, but it's something to consider.
The biggest issue is when the guitar is not set up properly. In particular it means the strings are too high off the neck of the guitar.
This will make it tremendously difficult to play bar chords properly.
SOLUTION:
Have your guitar instructor or a competent repairman look at your guitar and see if it would benefit from a guitar action setup.
This involves a combination of things including adjusting the bridge and the nut of the guitar to lower the “action”.
Also they may recommend adjusting the angle of the neck and even smoothing down the frets.
When done properly it can make most guitars easier to play and even sound better.
I strongly recommend having it done by a reputable repair person.
I have known mechanically inclined people to do a reasonable job by watching YouTube videos… but it's risky.
2. Find Out What You Don't Know
There are specific things that you need to know to play bar chords properly.
Some of the things are knowing how to place your index finger properly across the neck, the best angle for your wrist, where to place your fingers in relation to the frets and how to think about changing from one chord to the another properly.
Without understanding the proper mechanics you'll always be swimming upstream.
And more importantly you'll probably be practicing incorrectly and have to undo some bad habits later.
SOLUTION:
Learn the proper mechanics of playing bar chords.
A time-tested way to do this is to find a competent guitar instructor who could not only show you the proper way to do it but help you make corrections when you get off.
Another way that's becoming more and more effective is to learn from a progressive set of videos online where you can watch the technique and make adjustments from what you see.
3. More Of A Good Thing
Everyone knows they should practice. But in reality most students underestimate how much time and persistence is needed to make your body do something it's not used to doing… Like play barre chords
Okay, here's the bad news… You're probably going to need to practice more than you think you do.
Here's the good news. It doesn't have to be a bad thing.
Getting a consistent practice schedule can become a habit and gets easier what you do it regularly.
Also the act of practicing can be a positive experience when you just put your heart into it and stop thinking about how hard it is or other things you want to be doing.
SOLUTION:
First make some time to practice at least five days a week. I recommend 30 minute sessions for beginners.
Then spend some time in each practice session working methodically on bar chords. Don't expect immediate results but think of it as a long-term program.
You'll not only improve your bar chords but you'll be setting the mechanics in motion to improve everything that you choose to work on.
4. Practice The Right Things
So now you’re practicing regularly. That’s great. Let's take a look at what you’re practicing.
I interview students at my music school that have been playing for a while and want to take lessons to get better. One of the questions I asked them is if they are currently practicing regularly.
Most say yes.
Then I ask them how and what they practice.
What many tell me is that they play the guitar for some amount of time every day. This is not practicing.
Playing songs or even techniques that you can already play is not considered practicing.
Practicing means working specifically on either techniques or exercises, or even songs, in a progressive attempt to get better.
In the case of bar chords that does not mean just trying to play them for a certain period of time each day. It's possible to get better very slowly this way, but that's a long and painful road.
SOLUTION:
Use a progressive and methodical system to practice bar chords.
This would involve practicing specific exercises that will strengthen your hands and help you to get your fingers in the right place with the least amount of effort.
You also want to avoid creating too much tension in your hand and especially your wrist.
RGS Members:
Download your copy of the Barre Chord Chart <<
Not a member yet? No problem. Learn how to get free access.

5. Be Patient
We all know patience is a virtue… Right?
But most people, including myself, often act like it's a sin.
Wouldn't it be great to take the “Play Awesome Bar Chord Pill”? I'm right there with you
SOLUTION:
If your practicing regularly, practicing the right things and you've learned the proper technique to play bar chords there is just one more thing that you need…
That's to keep doing it until you get the results.
Playing bar chords accurately and smoothly is just a matter of getting the fingers in the right place, having the strength to press them down sufficiently and enough practice time (i.e. repetitions) to change chords and get to the next one in time.
That said I have never met a student who could not do it. It comes down to just doing the right things and to keep doing them.
How To Get Better At Bar Chords Without Doing Boring Exercises
Simple Way #1: Barre Chord Break (Play 1 - Rest 3)
The first in this series of five simple ways to get better at barre chords without doing boring exercises is a fairly simple approach. Does that mean it doesn't work?
Nope... In fact I think it's the best place to start when trying to improve your barre chords because it really does work.
It also makes the next approaches easier.
Here's how it goes…
You want to start by keeping a pulse. In other words create a beat… Could be tapping your foot, or even nodding your head up and down slightly.
I prefer to use a metronome. Start out slow. You can always pick up speed over time.
You’ll also pick a bar chord to use. Just one. If you don't have one in particular you want to work on I suggest the B minor bar chord. If you don't know the fingering you’ll find a diagram on the download sheet below.
I like to use the B minor chord because it’s one of the easier barre chords to make. It's also a very useful bar chord. Not quite as useful as the F bar chord, but a close second… And is definitely easier.
Now for some action: Play barre chord for one beat, rest for three beats, play bar chord for one beat, rest for three beats, and so on.
During the rest you can take your hand off. You’ll want to re-finger the bar chord and be ready in time for beat one.
This way your hand won't get tired as easily… But more importantly you're getting more practice putting your fingers in the right place.
This is a better practice than just leaving your hand there and getting sore.
Simple Way #2: Single Bar Chord Song
This is my favorite one. You’re going to play a simple four chord song or common chord pattern. Only one of the chords will be a bar chord.
You can use any common chord pattern with four chords, but let's start out with one that uses the B minor chord.
I'll break it down into steps:
- First get comfortable with the fingering of the B minor barre chord. If you're following these techniques in order that's already taken care of.
- Now practice the movement between just two of the chords - D and B minor. Start off by strumming the D four times, then the B minor four times, then the D chord again, and so on.
- Now practice moving between a second set of chords – B minor and A. you can follow the same process that we did previously.
- Next move on to three chords - D - Bm - A. Strum each chord four times. Start slow and try to get the movement without hesitating when you change. Keep repeating in your mind "patience".
- Now put the whole progression together. All four chords. That's D, Bm, A, and G.
- Add a Strum. Once you feel reasonably comfortable with what we’ve done so far and you can change chords without too much hesitation you can add a strum. I've included a suggested strum on the cheat sheet (download below), but you can use your own favorite strum also.
I know… It seems like a slow, tedious process. You might be thinking "why not just play the entire four chord progressions Tomas until I get it right?"
That's a fair question.
And the reason is when you try to play something that's out of your immediate grasp you will compensate with tension and make mistakes.
Your mind is recording and creating habits. You don't want it to record too many mistakes or create a habit of tensing your muscles.
The key is to create a challenge that's not too far out your reach so you can get it right in a short period of time without creating too much tension or bad habits.
Okay, enough theory. Let's go on to number three, the…

Simple Way #3: Single Bar Chord Substitute
This one is similar to number two. We're going to play a song or common chord pattern that generally can be played with open chords.
Only now you substitute a bar chord for the open chord (start with one bar chord).
I'm going to recommend you start with a progression that uses the G chord. By developing experience with the G chord you'll be able to play many bar chords.
Start with the progression I show on the video which is simply G - D - C - G. The C and the D will be basic open chords… the G is going to be a bar chord.
Another one I like to use that's a little more difficult is the common chord pattern: G (bar), B minor (bar), F (bar) and A minor (open).
You'll probably recognize the sound as it's been used in quite a few pop songs over the years.
(Check out the cheat sheet below for fingering diagrams.
Simple Way #4: Starting High
Start with an E minor bar chord on the seventh fret. Strum it several times and make sure all the notes are sounding.
Now move it down one half step (that's one fret) to Eb minor. Again strum the chord to make sure all the notes are sounding.
Don't worry about getting it perfect right now, but do your best within a few seconds to get it right.
Keep repeating this process going down by half steps. When you get to the A minor chord you can switch your fingers around and play it as an open chord.
Now do the same thing starting on the seventh fret, but this time making a B major chord. You'll find the fingerings on the cheat sheet… did I mention there’s a cheat sheet? 🙂
Keep going down by half steps until you get to the open E chord.
If you're not completely exhausted yet let's move on to…
Simple Way #5: Classic Rock Bar Chord Maximizer
This one will give you a chance to really move the chords around.
It's my version of
I say “my version” because the original uses a minor chord. I've been playing it since my teenage years with just three major bar chords.
It makes a great exercise for practicing moving the bar chords around in a standard progression (what we call the musical world a 1 - 4 - 5 progression, or I - IV - V).
I've included the original version with the minor chord on the cheatsheet just to be thorough. Have fun with both.
Also try Wild Thing by The Troggs. I'm sure there's others that I just can't think of right now.
In fact… let me know in the comments below if you can think of some that have the same progression… Or something close.
It's just for fun, and to get better at bar chords.
Get The Cheatsheet Here
How To Practice Barre Chords
A Unique And Effective Barre Chord Exercise
Barre chords can be daunting for new guitar players. They’re the first major challenge of fretting hand strength. So long before I teach barre chords I like to teach a primer exercise.
I found this exercise to be my favorite to develop that hand strength. It works best if you practice it a little bit at a time. Just a few minutes once or twice a day.
Here's How The Exercise Works
Take your index finger and barre it across the first fret. When I say “on” the first fret, I mean just behind it. Keep your finger fairly straight and roll it back just a little so it's just slightly on the side.
Don’t push down yet. Just keep your finger on the strings like you’re muting them. If you strummed right now the strings would sound dead.
This is the tension you should put on the strings for the "release" part of the exercise.
What we’re going to do is play one note at a time, while pressing down all of the strings. This is going to train your hand on how much pressure to use.
Press down on all of the strings and pick just the sixth (lowest, E) string. Did it ring out? If not, press a little harder.
You can use your second finger to help press down for now if you need to. When it rings out clearly release your hand so the string is deadened.
Your finger should be in contact with the strings at all times.
Now move onto the fifth (or A) string. Still the first fret. Press down on all six strings but only play the fifth.
How did that sound? If it rang, release your hand and move onto the fourth string.
You can adjust your index finger as you need to. But make sure you’re pressing down on all six strings no matter what string you pick.
Try to get through all six strings before adjusting your hand.
Once you get through the first fret you’re going to move the whole thing up one fret. Barre the second fret and start from the sixth string. Then the fifth.
All the way through the first string. Continue the exercise until you get through the fifth fret. Remember to release the fretting once the note rings clearly.
Think Of It As Pumping
I call this “pumping” because you’re pressing down and releasing every time you hit the string. This will keep your hand from getting too tired.
If you held your hand down the entire time it would get too tired too soon.
The full exercise goes through the fifth fret. Once you do that go all the way through it another time or two. That will be enough to add for a practice session.
You can use it as a warm up for your practice sessions too. Like I said earlier, do it once or twice a day.
You'll see little by little your left hand barring finger will get stronger and stronger. And you'll learn what pressure it takes to press down the strings.
As you move into more complete barre chords, that part of the playing chord will be easier. You'll be ready to tackle some of the other aspects.
A Couple More Barre Chord Tips
I know from experience when I show students this it’s a little awkward to play at first. That’s OK! New things on guitar will most often feel awkward because you haven’t played it before.
You can also try to start on the fifth fret and work your way down to the first fret. There is a lot less tension on the fifth fret then the first so it’s a little easier.
Actually, let’s try that. Barre the fifth fret, press down, and play the sixth string. Let it ring and then release.
Now onto the fifth string. Once you get to the first string move your finger down to the fourth fret. If the notes aren’t ringing clearly you might be too close to the fret. Move your finger back just a touch.
Remember, if the note doesn't sound good try it a few more times with slight adjustments and then move on. Don't get stuck on any one note.
Common Questions About Barre Chords
I get a lot of questions from guitar players learning barre chords. They start as grumblings about having to learn barre chords. But they turn into valuable insights and lessons.
I hope it’s encouraging to hear that most guitarists have the same struggles with barre chords. This is all part of the normal process. Trust me when I tell you that barre chords get so much easier with time and practice.
Let’s take a look at a few of the common questions about barre chords.
How Do I Play Barre Chords With Small Hands?
The same way someone with big hands would! It’s easy to look at guitar players with big hands and think they have an advantage.
Players like Stevie Ray Vaughn, Jimi Hendrix, and John Mayer all had/have big hands. But they still had to learn barre chords like the rest of us.
Bigger hands typically come with more strength. But that would really be the only advantage. You could try putting lighter strings on your guitar to make it easier to press down.
Also, it’s helpful to have your guitar adjusted so the strings are not too high off the neck and it’s overall easy to play.
But ultimately barre chords are hard for all new guitar players for the same reasons...
Why Are Barre Chords So Hard?
Barre chords are difficult in the same way open chords were when you first picked up the guitar. You’re using muscles you’ve never had to use in this way up to this point.
It takes practice and patience to learn anything new on the guitar. In the case of barre chords you’re also dealing with an entirely new technique from open chords.
Physically you’re learning to place the barred finger behind the fret properly. You’ll have to accurately place the rest of the fingers and angle the wrist in the right way. Now you’ll need to apply the right amount of pressure. Too little and the strings don’t sound. Too much and you get sore. Combined this with some muscles having to step up in strength and you’ve got quite a bit going on.
On top of that, there’s the emotional aspect. After some success with playing open chords, it can feel like you’re going backward when your initial attempts sound terrible.
Are Barre Chords Necessary?
I suppose if you worked hard enough you could find a way around barre chords. But they’re so useful it wouldn’t be worth it.
Barre chords aren’t just good to learn so you can play a full F chord or B chord. They also happen to be stepping stones for:
- Partial barre chords and Inverted chords
- More advanced extended chords
- Improved strength and dexterity
- More chord voicing options
- Understanding music theory
- Overall improved playing ability
Every chord you learn has something different to offer. So it’s a good idea to learn as many as you can all over the fretboard.
How Do I Make Barre Chords Not Hurt?
There’s no magical secret here, it’s just time and practice. Think back to when you first picked up the guitar. You started to get calluses on your fingertips and your hand got sore pretty quickly.
But as you played more and more your hand stopped getting sore as quickly. The same goes for barre chords. Your hand is going to get sore quicker right now. But after even a couple weeks you might notice it becoming easier.
The trick is to make barre chords a regular part of your practice routine.
Free Barre Chord Chart
RGS Members:
Download your copy of the Barre Chord Chart <<
Not a member yet? No problem. Learn how to get free access.
Need Some Help With Bar Chords?
Many of us on the guitar journey have been where you are. Barre chords require a different technique and a different way of thinking than what you've learned up to now. Without preparation, you’re swimming upstream.
I can help.
Using my 40+ years of guitar teaching experience I’ve created a step-by-step barre chord training program. I’ll help you go from struggle to playing barre chords as easily as basic chords... And have fun doing it.
Find out how you can get help with my 14-day FREE trial to Real Guitar Success Academy.
Tell Us What You Think - Please Comment Below!
We would love to hear your comments and questions. What specific things are you struggling with while learning guitar?


Tomas,
The title of this post, in my opinion, reduces the quality of the material that you provide. Scores of sites trade on how bad I am – just send me money and you will no longer suck they proclaim.
Your approach differenciated you. As a teacher and guide you make learning fun, based on achieving success by building confidence and skills.
That’s why I subscribed to your course – you were different in your positive approach. You focused on the pleasure of learning.
Alan Wayne
Life Coaching 4 Grownups
North Palm Beach, FL
Thanks for your comment Alan. I’m glad to hear you’re attracted to the pleasure of learning. The reason many marketers use the “pain” approach is because it actually is more effective at getting people to take action. While I prefer the positive approach it seems like a good idea to include both at least occasionally in the title. Of course the point of the article is to point out how to fix it and enjoy playing guitar more. – Tomas
Great video, will be fun to learn.
this is good stuff
Thanks Keshawn. -Tomas
Your comments are thought provoking. I have been playing for going on 2 months, not long and I try to “practice” bare minimum of 30 mins a day to an hour, sometimes longer n weekends. I am worried that I may be wasting my time on practicing the wrong things. Could use some advice. Currently i break my practice into 4 segments;
Segment 1 is warm ups; finger stretches, chromatic scale, pentatonic scale, picking exercise, etc.
Segment 2 is open chords ( I have the most trouble here especially C chord and A – I just bar A I cant seem to get 3 fingers on one fret and at least think I have fat fingers, but probably mid size. C chord is a bear. I spent an hour one day just practicing C chord and Ive been doign it a couple of weeks and feel like Im makign no progress, Ive tried curling up high on strings with 2nd and 3rd finger, etc, using tips of finger, holding guitar straight, elbow in close to body. Nothing seems to make a difference. I practice 10-15 mins on open chords. I am working on switching chords with metroenome but just think my C chords is really holding me back.
Segment 3 I work out of Mel Bay book/ do some Rocksmith or watch and practice out of videos on chords.
Segment 4 Is playing riffs with power chords which is the most fun so far and keeps me interested.
If I have 30 mins to practice I do 30 mins on segments 1,2, and 4. If I have an hour I try to do all 4 and longer first and 4th sessions.
Does this seem ok. Or should I try something else?
Hi Monte,
Your practice schedule looks very well thought out and organize. I’m impressed. You are obviously a very thoughtful and intelligent person.
As for giving you advice on how to improve here’s a few thoughts.
It’s hard for me to say much from seeing this because it’s only a snapshot of where you were when you wrote it. A lot of the learning process involves motion… As what you’ve done before, what you do next, and then what you do next.
I don’t know what you were practicing before the mentioned program and I can’t tell if this is in the correct order, or if it’s in alignment with your goals.
Two important aspects of learning guitar are: 1) learning skills in a progressive step-by-step order, and 2) getting feedback at critical junctures.
Because of the difficulties you described learning the basic chords I suspect that there is something out of whack with either the way your practicing them or with the order of your learning.
That said I want to at least direct you to a lesson on how to work on chords: https://tomasmichaud.com/how-to-play-guitar-chords/
If nothing else this will give you an idea of how a systematic approach words to learning aspects of playing guitar.
It wish you the best Monte, Tomas
Your barre chord chart appears to show fretting all 6 strings even when it’s a 5 string barre chord. Is there a reason for this ?
Hi Jan, when I bar a chord that has the root on the fifth string I always bar across the entire six strings. That six-string note is part of the chord and strumming it sounds fine. If I were playing just the bass note I would hit the note on the fifth string and then perhaps from the rest of the chord. If you prefer to only bar the five strings because it’s easier that’s good also.