There’s something special about picking up an acoustic guitar and fingerpicking through a few chords. It could be rainy or sunny. Cold or warm. By yourself or with friends. It’s right for every season and occasion!
One technique I find to be especially fitting is called “Travis Picking”. It’s named after country guitarist Merle Travis who pioneered it. Or at least brought it to the main stage. Today, this technique is used in many styles of music.
What is ‘Travis Picking’?
Travis Picking is a picking pattern mostly known for its alternating bass notes. The bass notes keep the beat and drive the song forward. Treble notes are added in between the beats and provide melody and color. Both of these combined create a colorful progression with a sense of movement.
While this technique can get plenty complicated, here is a simple and fun exercise to start with.
How do I play it?
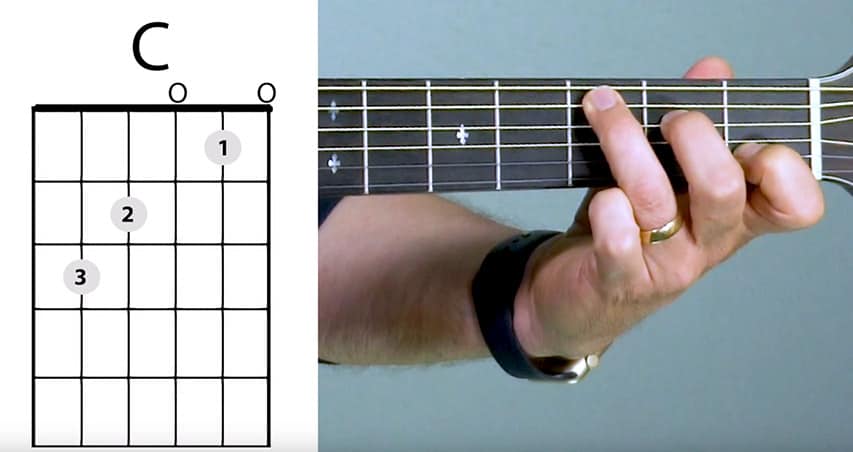
For this lesson we’ll start with our standard C Major chord:

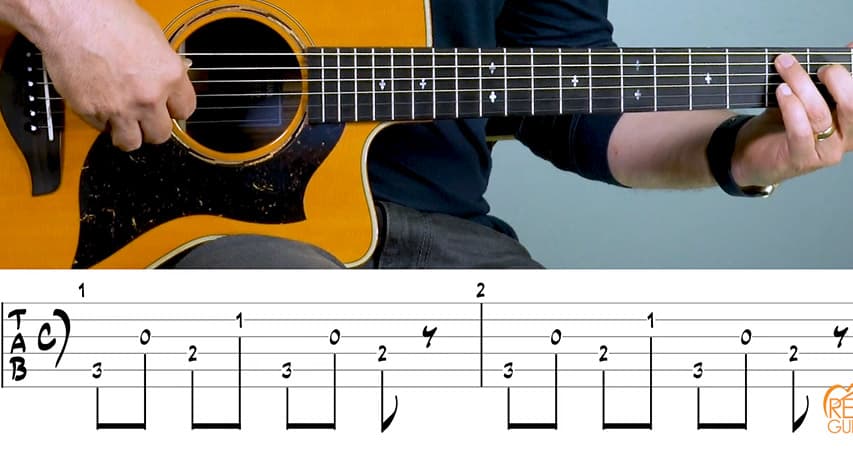
And we’ll use this basic picking pattern:

To get started, think about the bass notes as being played on the down beats. These are the notes on the 4th and 5th strings. The treble notes are played on the up beats. If you count “one and two and three and four and..” the treble notes are on the “and”s.
(Check out the video if the rhythm doesn’t make sense. Sometimes it’s easier to hear it first!)
Use your thumb for the bass notes, and your index and middle finger for the 3rd and 2nd strings respectively. Your right hand will do most of the work here. Your left hand is just holding the C chord.
Helpful Tip: If you’re finding this difficult, try playing just the bass notes at first. But make sure to count out loud for timing. This will help your mind understand the pattern. Once you can play that without thinking too much about it, add in the treble notes. As always, start slow and build speed over time.
Once you’re about 80% there with this pattern you can move onto the full progression. The good news is your right hand doesn’t change at all! You’ll use the same fingers on the same strings with the same timing. Only the chords will change.
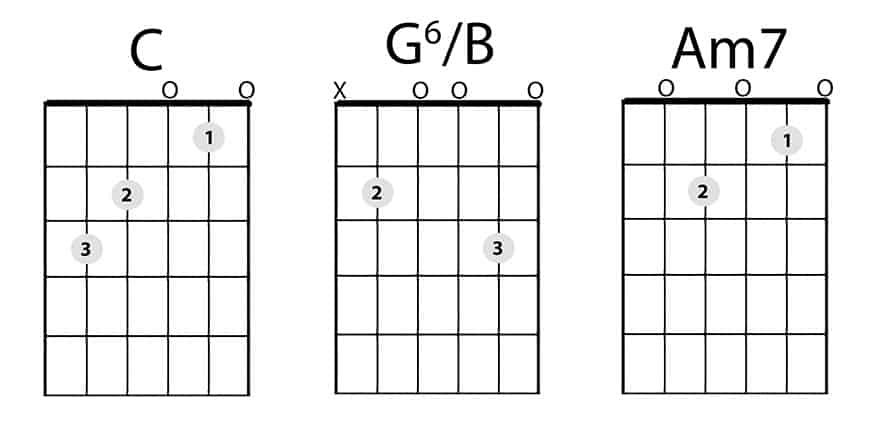
The progression is one measure each of C, G6/B, Am7, and G6/B. Here’s what each chord looks like:

A Fun Way To Play
The cool thing is you can use this technique with any progression. Try it the next time you pick up your acoustic.
It can be a bit of a challenge at first. But once your mind is able to follow the pattern you’ll be surprised at what you can do!

That was nice, especially the pull off. This kind of Travis picking, is it used more for playing melody, fills between vocals or can it be used for accompaniment? I’ve dabbled with regular fingerstyle for vocal accompaniment. Thanks.
Hi Frank, It’s used for all of the above as well as playing solo guitar pieces.
Thanks for this lesson. However, you need to post a follow up that teaches how to play chords whose bass note is on the 6th (E) string and the 4th (D) string.
Thanks Tom. I truly enjoy finger picking my acoustic guitar and your assistance in helping me learn this technique is appreciated.
I’ve always had a hard time trying to fingerpick. This little lesson was a good one for me. I’ll have to work on it for quite a while. Unfortunately, I have to keep backing the video up to understand where my fingers area supposed to be. Thanks for the lesson.
Excellent lesson! 👍 Thanks!
I am beginner learning Classical Guiter, I like your websites.
Thanks Kimsa. – Tomas
Hey thank you! I’m trying to learn the John Prine picking style.This was very helpful to get me started!
Thanks I really enjoyed this lesson. I can’t wait to learn the rest of the song